


Hi, Neus @miss.meissa here, and today I'm going to be showing you tips and tricks for learning how to use brush pens for brush calligraphy. A beginner's tutorial so you can learn brush pen calligraphy (also called brush lettering) from zero and practice relaxing exercises that are basic for modern calligraphy and some types of hand lettering. Including calligraphy practice sheets with beginner's exercises.
Supplies
- Archer & Olive Calliograph brush pens.
- Paper. I recommend the Archer & Olive notepad or smooth print paper if you are using the printable practice sheets.
(Feel free to use my affiliate code MISSMEISSA for a 10% off at archerandolive.com).

Tips to hold the brush pen
First things first, we call brush pens flexible-tipped pens that allow us to make strokes with different thicknesses. And to use these markers in a way that makes it easier to control these changes in thickness, it is very important to hold them properly. So before I start with brush pen calligraphy strokes, I'm going to talk a little bit
To begin with, where to hold the brush pen?
I recommend you to hold the marker not too down and not too up, in the area I show in the picture.

If you look at the large tip of the Calliograph brush pens, you will see that the marker has small marks in that area to help you. Many markers have this to indicate the area where it is best to hold them and to make it more comfortable.
This way we will be able to have the movement we need and this way we can also hold the pen at 45º, which is the inclination we need. Not too vertical and not too horizontal, which would be very uncomfortable. You don't need to calculate exactly what 45 degrees is, it is enough if it is more or less the intermediate inclination between horizontal and vertical. This way it will be easier to make the strokes with different thicknesses.
The next thing we have to consider is how to hold the marker. In what way and with which fingers?
Each person holds the pencil differently when writing, there are many ways.
If you have watched calligraphy videos with brush pens, you will have seen that there is no single way and each person ends up finding the one that is most comfortable for her or him.
But I also want to tell you that you don't necessarily have to hold the brush pen the same way you hold the pencil when you write. So I'm going to explain the recommended way so that you can at least try it and practice:
I recommend you to hold the marker between the index finger and the thumb and rest it on the middle finger. Then let it fall into the hollow of the hand (see the picture). This way you will have a good grip and you will be able to move it well.

I'll let you in on a secret, this is not the way I write. And it took me a while at first to hold the brush pen differently than regular pencils, but it's been a game changer for my brush pen calligraphy.
Keep in mind that you need to move the whole hand, not just the fingers but to have the full movement.
And one more thing, try to sit in a comfortable posture and with your back straight. When we do calligraphy with brush pens we concentrate a lot, relax and sometimes even lose track of time, so your body will thank you for keeping a good posture!
Basic brush pen calligraphy strokes
The basic idea behind brush pen calligraphy is to keep in mind that the strokes that go up are going to be thin and those that go down are going to be thick. Thin up thick down. And the way to achieve this is to apply different pressure; when we draw a line up we apply little pressure and therefore the stroke is thin and when we draw a line down we apply more pressure and because of the 45 degrees position of the pen we get a thicker stroke.
One of the nice things about Archer & Olive Calliographs is that they have two tips. The thick tip that I am using in the examples and the fine brush tip. If you are a beginner, you probably will find the fine tip easier to use. So I recommend you start with this one although I'm going to show you with the large one so you can see it better in the pictures. My personal recommendation would be to try both of them and use the one you feel more comfortable with first. Make it easy on yourself. And when you feel a little confident, practice with the other one.
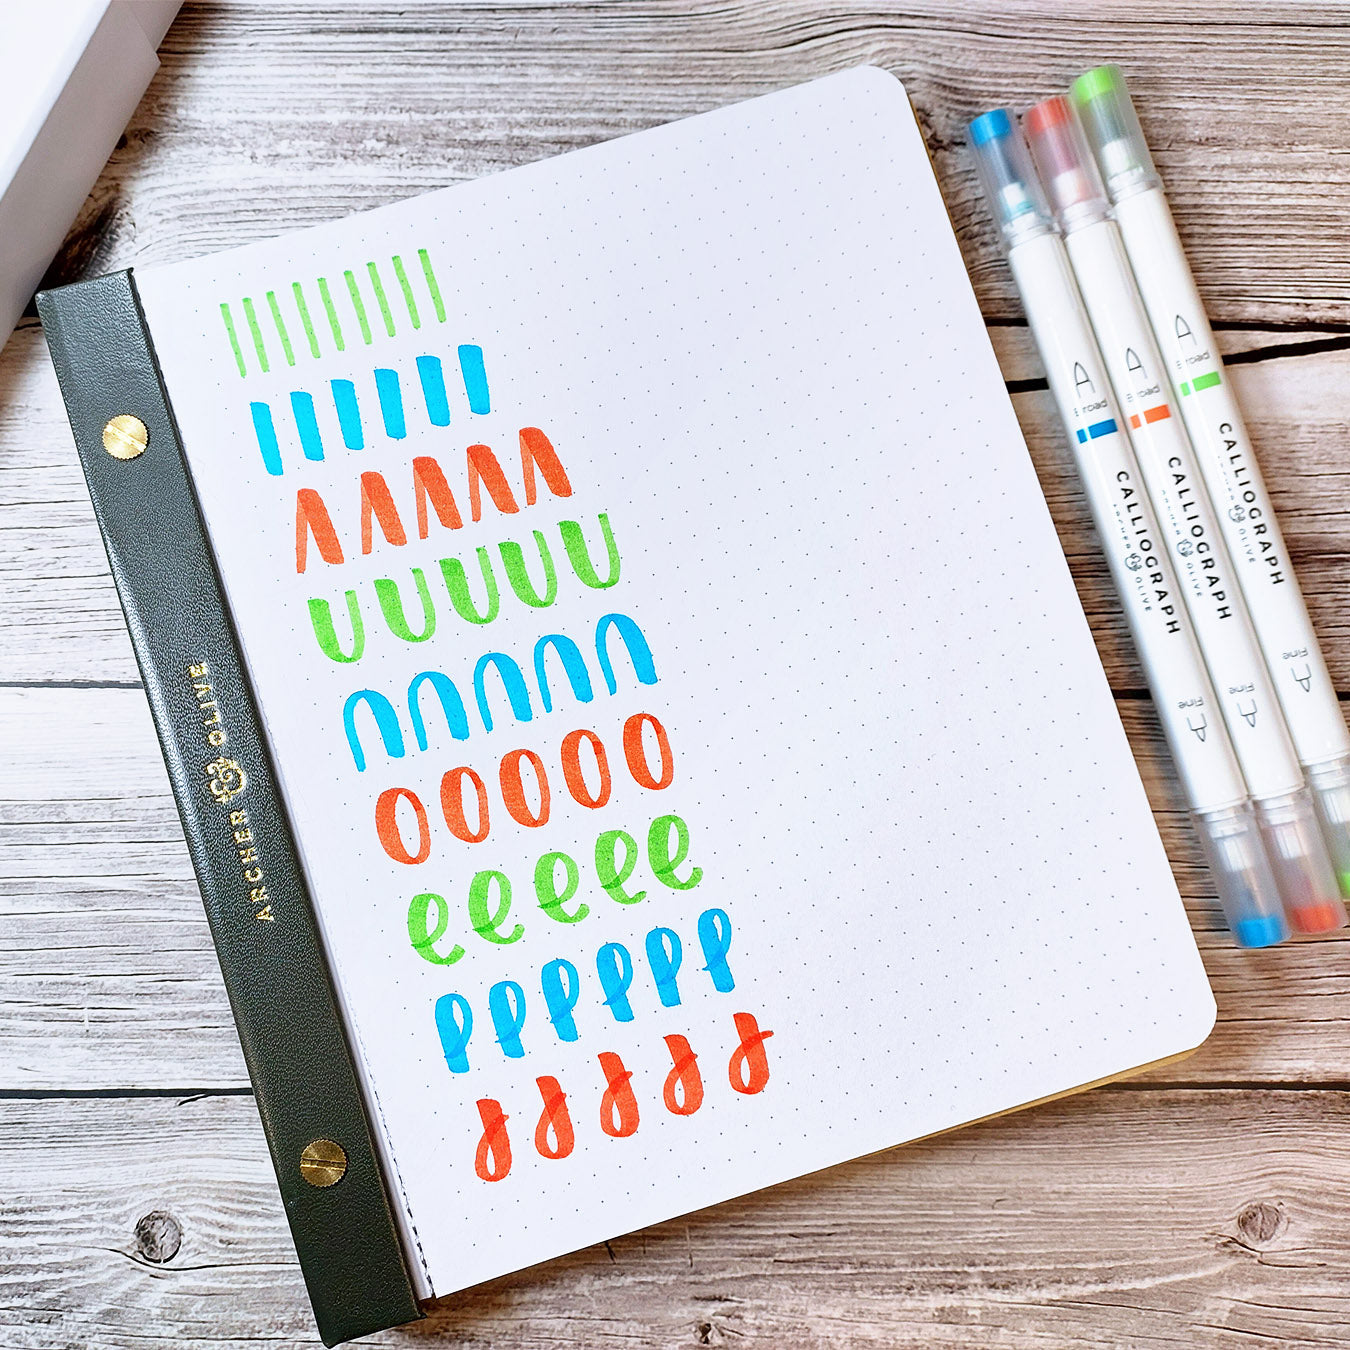
1. Upstrokes
Let’s try out some stroke exercises to learn how to use the marker and so little by little you will get practice making letters, texts and everything you want.
Remember the basic concept: thin up thick down.
We begin by practicing the upstrokes. As I said, we have to apply little pressure to make thin upward strokes. Just touching the paper. Do these lines until you reach the end of the paper, at least a couple of times. In fact I recommend you to make a lot of each of the drills I'm going to show you to practice.
Don't worry if at first the lines are a little shaky or uneven, it's normal and everyone (EVERYONE) you see on social media has been there. In this, practice makes progress.

2. Downstrokes
Next we are going to practice downstrokes, which are thicker.
We need to apply more pressure and the flexible tip will make the rest. Try to apply constant pressure from start to finish to make the line even.
The Calliograph brush pens have very reliable tips, so with some practice you will master it.

3. Combined upstrokes and downstrokes
After you have practiced these two types of strokes, which are the basis of calligraphy, let's put them together to form kind of an inverted V shape. Draw a thin upstroke without pressing and when you are up apply pressure and make a downstroke, thin and thick.

4. Underturns
Now let's practice curves.
We're going to start by practicing underturns. Meaning we are going to draw something similar to an U.
The key for this is to know that you don't have to apply pressure all the way down, but start releasing as you approach the end of the downstroke.
So I start my downstroke applying pressure, about three-quarters of the way down the line I start to loosen the pressure, I make the turn drawing a curve without pressure and I draw the upstroke. I begin thick, let off a little bit of pressure, make the turn and go up thin.
This is a little hard at first, but with calmness and practice you will be great, so don't worry. I used to get very strange strokes at the beginning too!

5. Overturns
Now we are going to do the same but in reverse for the overturn.
I start up thin, draw the curve and press more to the downstroke. Again, it is very important that you don't start pressing as soon as you get to the top. You should first turn, make the curve and once you start the downstroke, gradually add pressure and complete it.

6. Ovals
In the next exercise, we combine the two, because we're going to draw ovals.
I'm going to start drawing the top right of the oval, draw up, make the turn to the left, start applying pressure to the downstroke, release pressure to draw back up and close the oval.
The trick to making this shape look good is not to start with the downstroke but with the final part of the upstroke. This is because it is quite difficult to put two thick lines together and have them be equally thick and completely coincident. If I did, I would have a hard time closing the oval and getting it right.
Since matching two thin strokes is much easier, I start at the top of the thin one and this way this oval is much cleaner. So here's a trick for making O's and making them look better.

7. Loops
Next we are going to practice some loops.
We start with something similar to the letter E.
I begin by drawing a small loop and then I close it in a similar way to what we have done with the oval. Very slowly and calmly, enjoying the strokes.
Practice these drills for at least a couple of lines to get a better practice.

8. Ascender loops
The following are the loops that we will use for the ascenders and descenders of the letters. I'm going to draw first what would be the ascender of the letter L.
I start by making the loop similar to the previous one, but a little narrower. Once I have drawn the curve, I finish it with a straight downstroke.
This will be useful for the L, the H and the D or the F if we draw them with a loop.

9. Descender loops
Now the other way around: I start drawing the downstroke, thick, release some pressure before reaching the bottom, I draw the curve and go up with the tip of my marker, drawing a small loop.
This stroke will be useful for the G and the J.

And these are the most basic calligraphy strokes. I recommend you to practice them a lot because once you control them you just have to put them together to draw beautiful letters.
You can see all these tips and practices in the video below.
You can also download my brush pen calligraphy practice worksheets.
Click to download now:

Thank you for following this article and practicing with me. I hope you enjoyed!
If you post your practices on your socials, you can tag me @miss.meissa, @archerandolive and @archerandolive.community so we can see them. And don’t forget to add #AOShare and #archerandolive 😊
If you want to continue learning, you can take a look at these two articles on brush pens calligraphy:
FREE Hand Lettering Workbook + Tips To Improve Your Modern Calligraphy by Kate from @journalwithkate
Five Tips for Pro Brush Lettering in Your Journal by Missy Briggs @missybriggs.
You can also check the resources on my website or see more of my creations and videos on my Instagram and Youtube accounts.


0 comments