


Hello, hello! This is @kinglinguae from instagram :). As a fan of Archer and Olive since high school, it’s truly an honor and pleasure to be able to guest blog for this wonderful company. A short intro about myself: I’m a 4th year undergraduate student at University of California, Davis double-majoring in Biological Sciences and Spanish. I plan to (hopefully) go to medical school in the future - and that’s how I started bullet-journaling. Although it may be hard to believe, I started making aesthetic study notes because of the heavy load of science classes I have to take as a pre-medicine student. Finding a way to creatively make my notes allowed me to organize my thoughts better and motivated me to review my notes afterwards.
That being said, here’s how to create aesthetic study notes in your bullet journal!
Please note: I use a blackout journal because white pages are…too much for me sometimes. It feels like I have too many options and I can never make a decision on how I want my spreads to turn out. Using a blackout journal limits those options for me, but you in no way, shape, or form have to use the same materials I use! The point of an aesthetic academic spread is for it to be pretty to you (so that you feel more inclined to review your notes in the future) AND for it to be practical, in terms of effort put into the spread and how much you’ll use it for studying.

Here are the materials I used (use my affiliate code KING10 for 10% off your purchase through the Archer & Olive website):
- Acrylograph Pens Tropical Collection 0.7mm Tip (Archer & Olive)
- Calliograph Pens - Tropical Collection (Archer & Olive)
- B5 Moon Phases Blackout Dot Grid Notebook (Archer & Olive)
- B5 Black Dot Grid Notepad (Archer & Olive)
- A5 Rainbow Notepad (Archer & Olive)
- Metallic Color Pencils (Archer & Olive - from the December Quarterly Subscription Box)
- White Gel Pens (Archer & Olive - from the December Quarterly Subscription Box)
- Stickers:
- Create Your Own Stickers Set - Piccadilly
- The Antiquarian Sticker Book: Bibliophilia (The Antiquarian Sticker Book Series)
STEP 1: I would say the first step to making any academic spread is to organize your thoughts and think about what is the most important for you to study. Depending on the journal size, you have a limited amount of space and it’s better to reduce the number of pages you use so that it doesn’t seem like there’s too much for you to go over when you come back to review your notes.
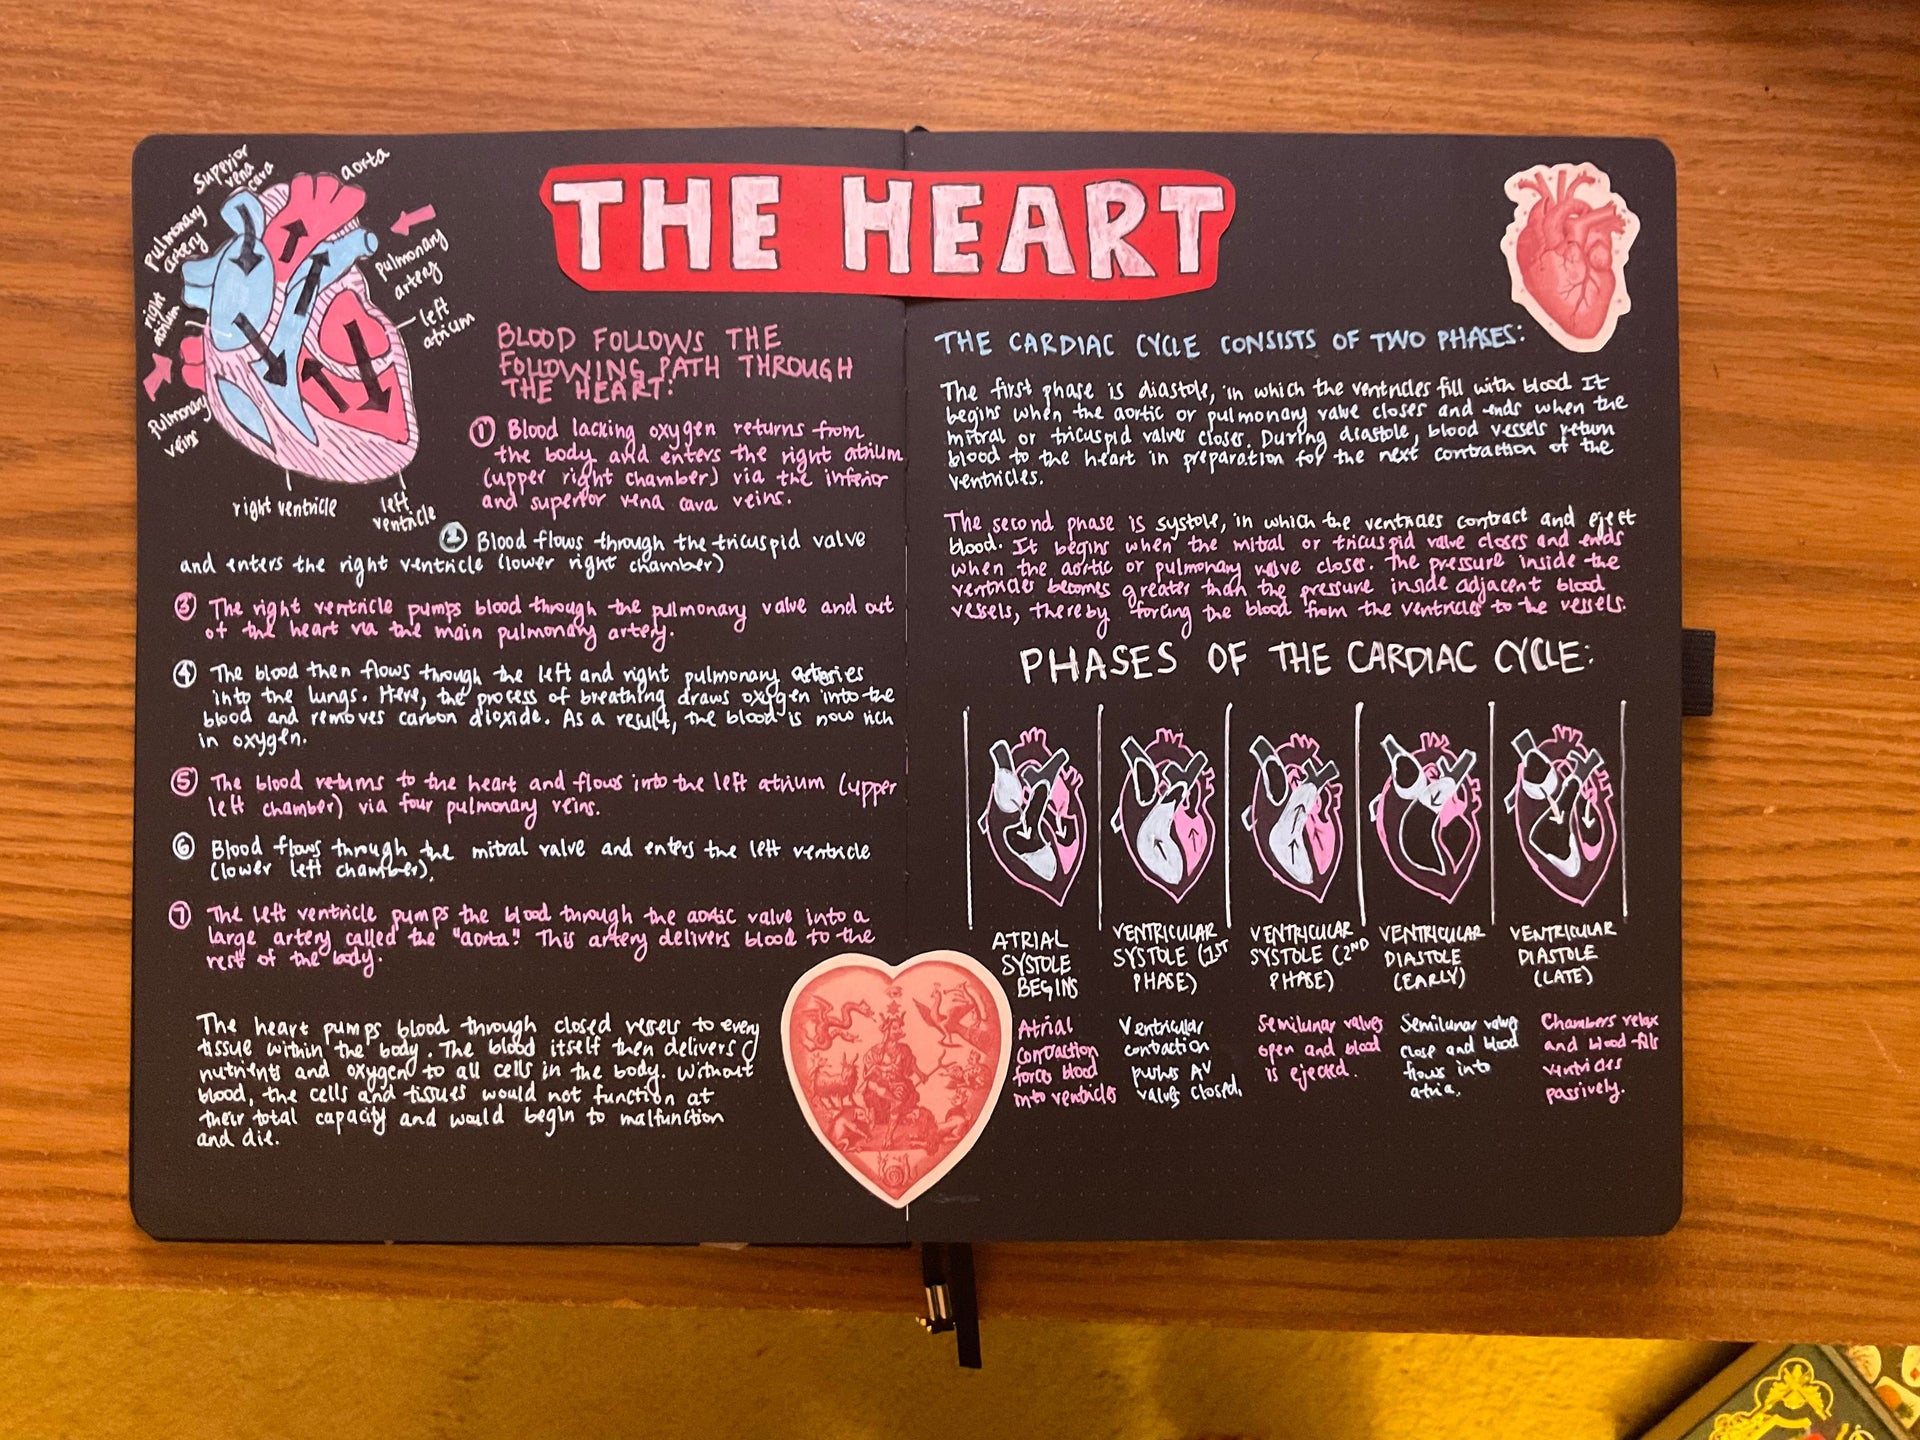
STEP 2: I’m a heavy visual learner, but even for people who aren’t, making diagrams and drawings are extremely useful for your study notes! They allow you to visualize the material in a more tangible way and that lets you interact with the concepts more. In my spread on the human heart, I made a heart sticker to visualize the flow of blood through the cardiac system.
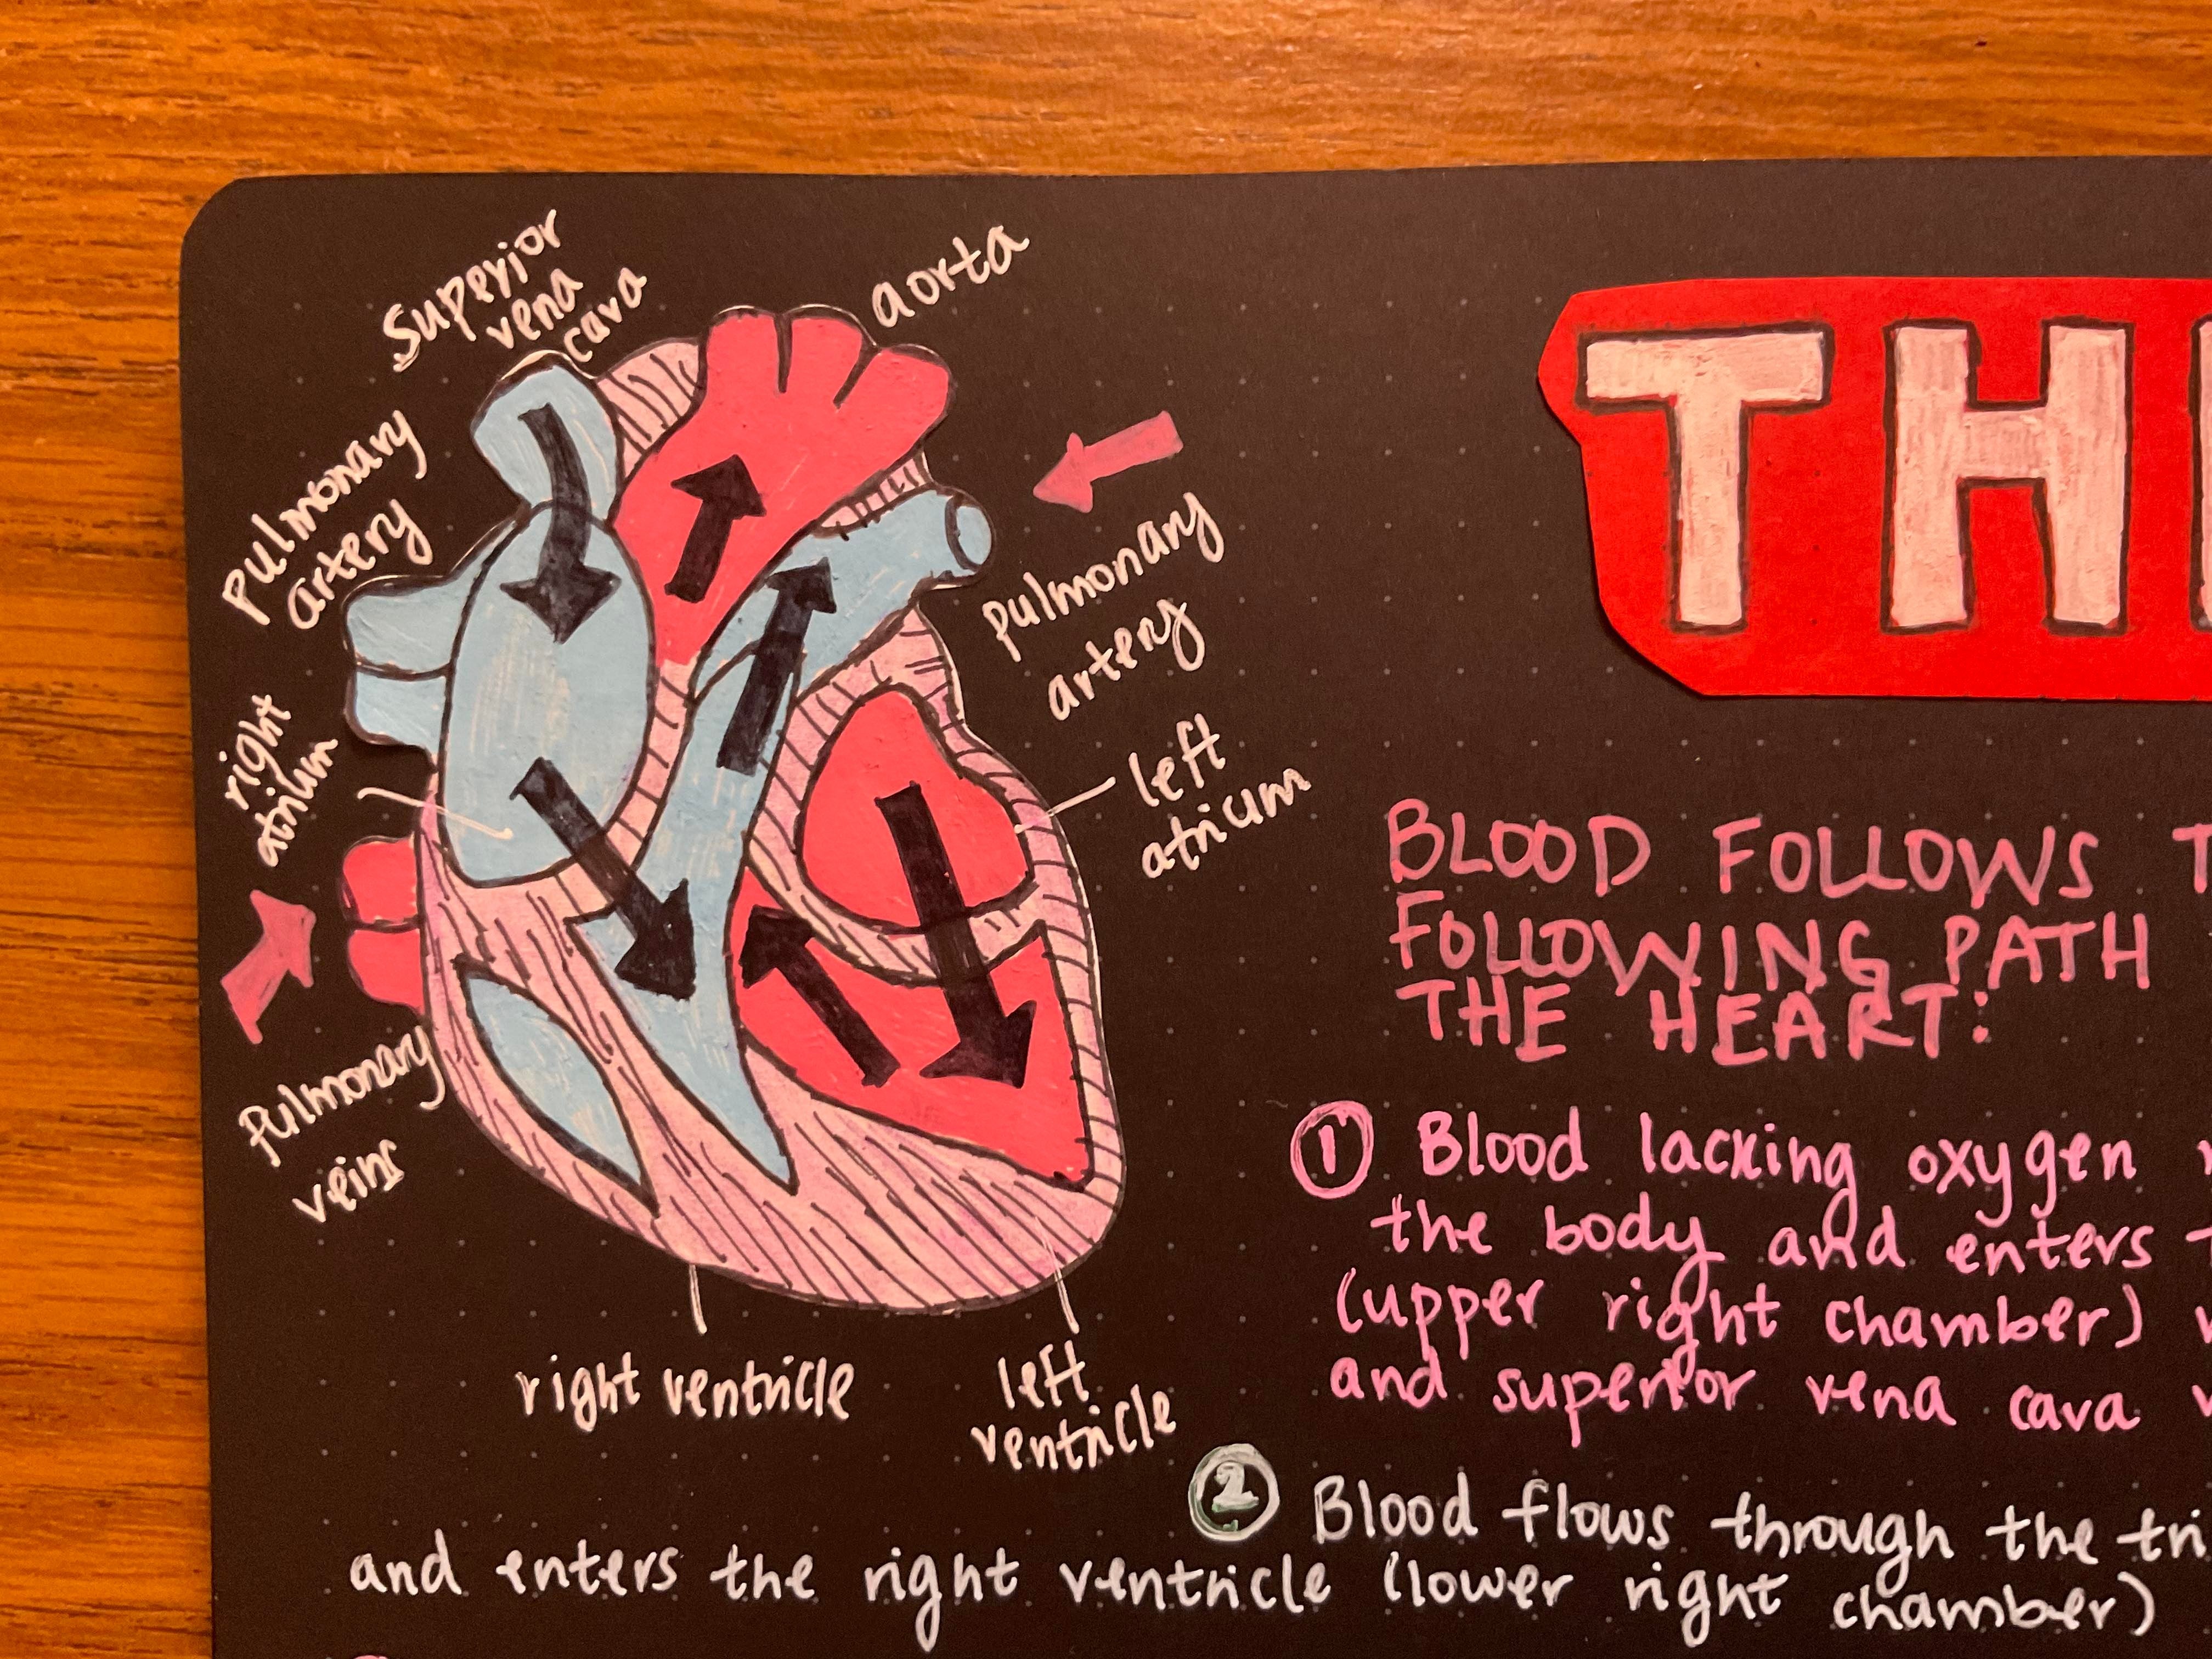
STEP 3: Think about how you’d like to make your information flow - what works for you? Flashcards, lists, bullet points, charts, graphs, the list is endless. Try to have fun with the spread you’re making. The more effort you put into making the notes, the more you’ll remember the content afterwards. What colors would work with the spread - maybe you can use blue for the info on deoxygenated blood and the red for oxygenated blood. I’m really big on breaking down the information I’m learning into lists and charts.


STEP 4: Even if this is an overused phrase: don’t be afraid to make mistakes! It’s hard for me to move past mistakes that I’ve made in any of my spreads, mainly because I have perfectionist tendencies. But, in hindsight, it’s actually helpful when you’re studying. Instead of thinking, what was that word - the blood flows away from the heart through the…what? I remember the mistake I made and think, the blood flows away from the heart through the…arteries, ugh, I messed that word up in the spread, it looks so cramped.
Finally, if none of the above is working, it’s really not necessary to create a fancy spread. Paper and pencil work perfectly fine as well and you can always slowly work your way up to more complex spreads.
See me create this spread here!
Hope you enjoyed the time-lapse and please do reach out to me on @kinglinguae if you have any questions, comments, concerns, or even just to say hi :). Please do tag me if you use any of my tips, I’d love to see your spreads! Also, you can always use my affiliate code KING10 or my affiliate link for 10% off your purchase through the Archer & Olive website.


4 comments
This is actually really cool to look at! Thank you for the pointers❤️ I’m going back to school and this is like an amazing guide to help me make my notes look more aesthetically pleasing❤️
Well done Sana! I’m so proud of you!
Wow this is so cool!
I loved seeing how the spread was created through the time lapse and will definitely be using the tips given for my own studying notes! Keep up the good work <3