


Hi, Neus @miss.meissa here, and today I'm going to be showing you how to paint leaves in watercolor. In this watercolor tutorial I am going to introduce you to some watercolor techniques and show you 6 easy leaves you can paint with watercolor. So you will be able to paint watercolor flowers with amazing leaves. This is a very relaxing way to paint and ideal if you are a watercolor beginner.
Supplies you will need
- Watercolor paper
- Archer and Olive's watercolors (woodland foliage set)
- Round brush (I recommend number 6 but whatever you have will be ok
- Water
- Mixing palette
(Feel free to use my affiliate code MISSMEISSA for a 10% off at archerandolive.com).

General tips
Before anything else, I encourage you to watch the video at the end of this article. So you will understand more easily the different positions and movements of the brush.
Painting with watercolor is very relaxing. You don't need a lot of space or supplies and you can paint in short breaks if you don't have much time.
If you have never painted with watercolor before, it is very simple:
dip the brush in water, take some paint by rubbing the pan delicately with the brush and mix it well in a palette, adding as much water or paint as we need.
I recommend using a lot of water. In watercolor you paint from light to dark. This means that it is better to start painting with little paint and much water and then add more layers if we want the color to be more intense, because getting a lighter color once painted is more difficult.
For this reason, when we want something to be white we will not paint that part (although you can always use a white acrylograph or gouache if you want to add a shine or a white touch after painting.
Having clarified this, let's talk about painting leaves.
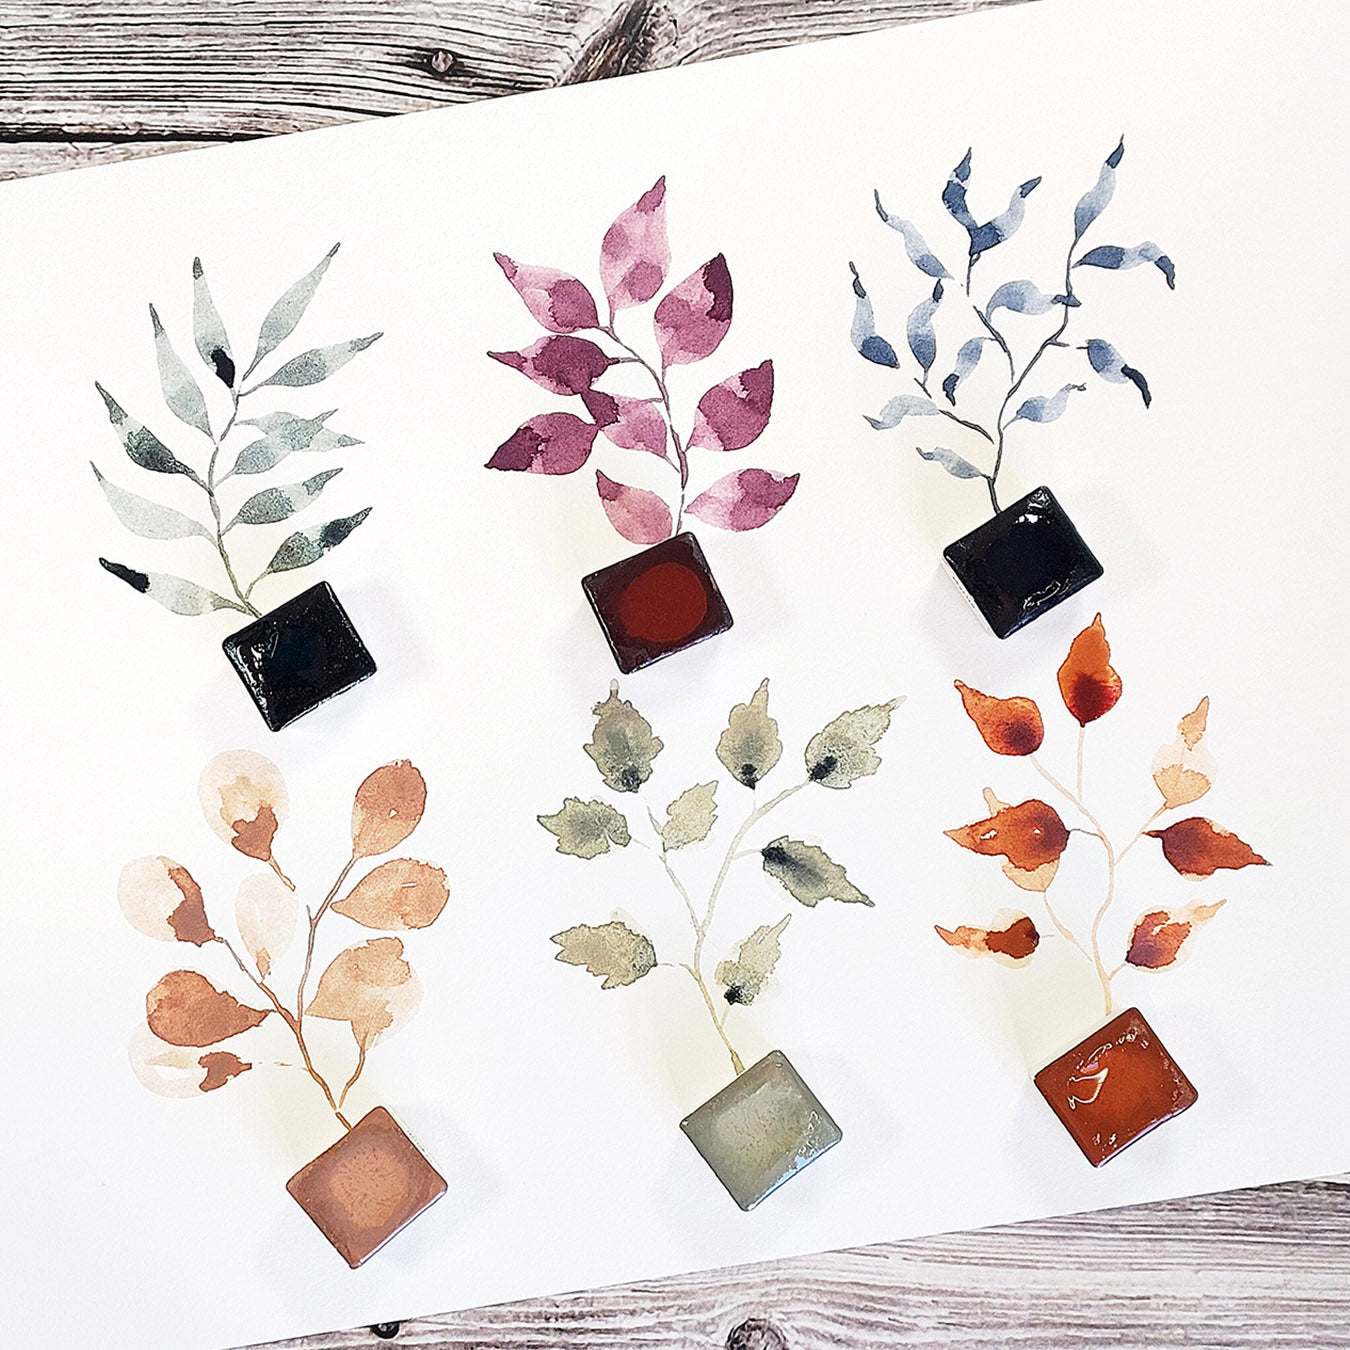
1. One stroke leaves
 (Color: Midnight Mist)
The first way many of us start painting is using the tip of the brush to draw the outline of the leaf and then fill it in. But if we use the whole brush we can make them in a very easy and relaxing way.
The most basic way to do this is to start with just the tip of the brush to paint the stem of the leaf, gently rest the belly and drag the paint to form the bulk of the leaf and then gently lift it back up to finish with the pointed end.
I recommend you to do this slowly, especially at the beginning and repeat it many times to get the hang of it.
Once you feel confident we are going to paint a twig with this type of leaves.
We begin by painting the stem with an irregular and slightly arched stroke. To do this, use only the tip of the brush, barely touching the paper. You can also use a thin brush to do this. Then, with the wet brush, take some paint from the pan, mix it well on the palette. And squeeze it so the tip of the brush is thin and draw the stem.
At the end of the stem we paint our first leaf, with the technique we have been practicing: thin with the tip of the brush to begin, delicately rest the belly of the brush, drag the paint and lift gently to form the tip of the leaf.
After the first leaf we continue painting more on both sides, without leaving too much space between leaves. It is okay if some leaves are very close together or even if one leaf overlaps the others. Although there are plants that are perfectly symmetrical, there are many that are very uneven, so this gives a more lively look to the painting.
2. Double leaves
 (Color: Soft Mulberry)
If we want wider leaves, it is enough to join two brushstrokes.
We paint the first brushstroke as in the previous drill and then paint another one right next to it.
You can also arch the brushstroke a little while the belly is resting to make the leaf wider or add more strokes if you want to make a larger leaf.
Another option is to leave a little space in the center between the two strokes simulating the center of the leaf. The important thing is that the two strokes are joined at the beginning and at the end in a thin line.
We are going to paint a second twig and we will do it as in the first one but with double leaves. So again, paint the stem with just the tip of your brush and begin with the leaf at the end. But in this case joining two brush strokes. Starting with a thin stroke on one side of the stem, resting the belly and lifting the brush. And again just to the side, painting a leaf centered to the stem.
You can always correct the leaves and repaint. We do this for fun and to relax. So it doesn't need to be perfect at all.
Again, it's good to have lots of leaves on both sides, so don't worry if some are too close together. And if you want you can overlap a leaf or two.
3. Uneven leaves
 (Color: Myrtile)
This one is super fun because it is totally carefree. It’s similar to the first branch but while we are resting the brush we will move it making uneven strokes like in the picture.
For the twig, we also start with the stem but in this case we are going to add some thin branches to the central stem. And we will fill it all with these leaves.
So just relax and make super loose strokes.
4. Rounded leaves
 (Color: Meadow Pink)
Now we are going to paint another type of leaf. For this one, you start painting an arched brush stroke, make a turn with the brush dragging the watercolor, close the leaf with the tip of the brush and fill in if there is any empty space (If your brush is thicker or you paint a smaller leaf you probably don't need it).
This one is a little more difficult, but with a little practice you will get the hang of it.
You can also use two arched brush strokes, one on each side and join them together to form the rounded shape of the leaf. Whatever is most relaxing for you.
So we paint the stem with the tip of the brush and add some little branches too.
And for the leaves we begin the arched stroke, turn with the brush, close the leaf and fill it.
You can always complete the leaf, modify it or add more water or more paint to make it more uneven.
In this one I also like to overlap a leaf, and I add an extra layer of paint so that it is well seen that it is on top of the other one and the two are not blended.
5. Serrated leaves
 (Color: Pale Moss)
Another super easy and carefree leaf. For this one we only have to use the surface of the brush resting it in different touches joined together to form this serrated leaf. Always remember to make sure that the leaf is wider at the stem and ends in a pointed shape.
Again, we paint the stem and some branches and at the end of each one we rest the brush in different dabs to create the leaves. And you can use the tip of the brush to make the pointed part of the leaf.
You can always complete the leaf, modify it or add more water or more paint to your liking. I recommend doing this when the paint is still wet so that it blends perfectly.
I have painted these leaves with more water because I will add another color to them. This is a little trick you can use when painting with watercolor. Just take some paint on a different color and dip your brush into the wet paint. The two colors will blend by themselves.
6. Uneven double leaves
 (Color: Burnt Ocher)
For the last branch, I will make a variation of the third one but this time with double leaves. Kind of a mix between the second and the third.
I start with an arched stroke, as if I were going to paint a circle, open the stroke and close it again in the tip. And the same on the other side. This is how I form the leaves in the photo. You can paint irregular brushstrokes because this leaf is beautifully imperfect.
So as before, we paint the stem with the tip of the brush and add a few short branches on both sides. And at the end of each branch we paint one of these leaves.
I am also going to use plenty of water because I will add a little bit of the reddish tone that combines very well with this ocher.

You can watch all this explained in the video below.
And you can also download the drawings of the leaves to use them as examples or to color them.

I hope you enjoyed this tutorial and that you are encouraged to paint with watercolor.
I recommend you to practice these strokes many times and let yourself get carried away by the paint and water. Don't worry about painting perfect plants, remember that you can always paint over them or add more leaves.
And if you prepare your favorite drink, light a candle or play your favorite music in the background, painting greenery is a perfect ritual of self-care and relaxation.
If you post your practices on your socials, you can tag me @miss.meissa, @archerandolive and @archerandolive.community so we can see them. And don’t forget to add #AOShare and #archerandolive 😊
If you want to keep practicing, there are plenty of tutorials on the Archer & Olive blog, I encourage you to check them out. Here are some of my favorites:
Quick + Easy Loose Watercolor Floral Tutorial by Sarah from @essjay_florals
How To Create An Easy Spring Watercolor Floral Pattern by Ali from @according.to.ali
Watercoloring Leaves For Memory Keeping And Mental Health by Mark from @Menwhobullet
You can also check the resources on my website or see more of my creations and videos on my Instagram and Youtube accounts.


0 comments