


I don’t know about you, but I’m kind of obsessed with finding the best storage solutions for all of my favorite art supplies. That means that organizing my growing Acrylograph pen collection has been top of mind for quite some time!
Originally I was inspired by this post to purchase some clear acrylic storage drawers for all of my pens (I ended up choosing these drawers from The Container Store for my storage needs). I carefully lined up all of my Acrylographs, in rainbow order, of course, and filled the drawers with Acrylograph goodness. I loved the way it looked, the drawers were perfection, the rainbow was lovely - everything was coming up roses over here in the studio…
That is, until I started working with my Acrylograph pens. I quickly realized that I really enjoy having my pen collections together. When I wanted to work on a fall project, I didn’t want to have to pick and choose from my pens to find a coordinating set of fall colors… I just wanted to be able to grab the, already coordinating, warm or cool fall set and let the brilliant product designers at Archer & Olive do the color-selecting work for me!
I wanted to create a way to keep my pens all pretty and lined up in my drawers, but I also wanted them to be connected together so that I could easily grab one set at a time and go!
That is exactly why I came up with this idea for storing my pens!
My Acrylograph Storage and Organization Solution:
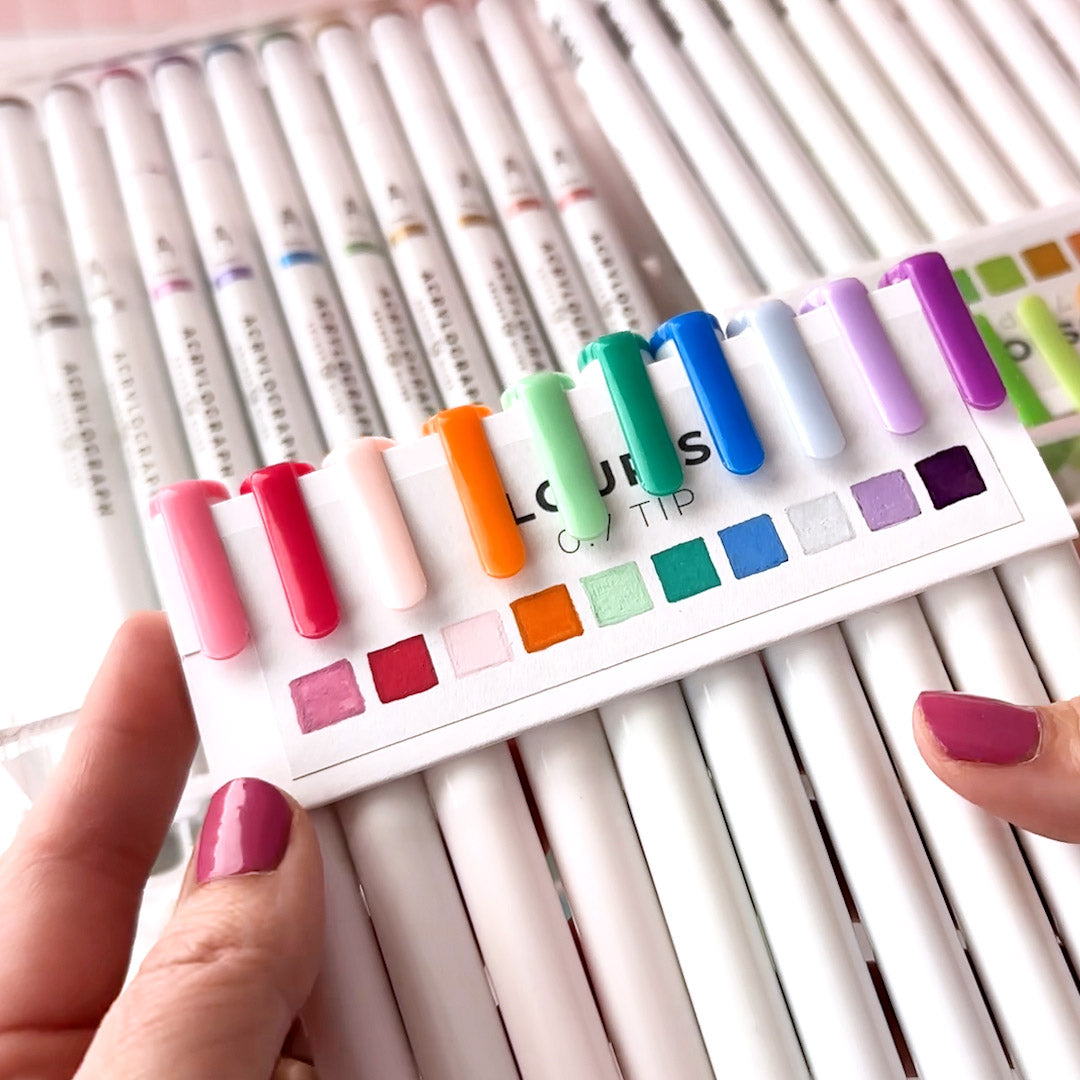
Inspired by the little cards that are included with the smaller Acrylograph collections, I created these cardstock cards and coordinating swatch labels. These handy little swatch cards help allow me to keep each of my Acrylograph collections neat and organized, while still storing all of my pens together in one place!
ALL of my Acrylograph collections are now super easy to grab anytime a project is calling my name!
PLUS just look at how clean and organized all of my Acrylographs look on these cards, stored in my clear acrylic drawers!

Want to make your own Acrylograph swatch cards?
Here are the supplies you’ll need:
- A set of Acrylograph Pens from Archer & Olive (I’ll be using the All That Glitters collection).
- White cardstock (I’m using a 100# weight but any cardstock will do).
- White sticker paper. My favorite affordable choice for projects like this is the MACO White Full Sheet Labels.
- If you don’t have any label paper you can simply use regular paper and Scotch tape.
- Printable Acrylograph swatch labels (Download below for free!)
- Paper cutter or scissors.
- Scoring tool (I will be using a Mini Score Board but you can use any type of tool to crease your folds).
- A basic ruler for measuring and/or scoring.
Don’t forget! You can save 10% on your purchase at Archer & Olive using coupon code Shawna10!
Note: Some of the links in this post are affiliate links - this means if you go through them to make a purchase, I might earn a small commission at no cost to you!

Free Acrylograph Swatch Label Printable:
Before we get started with this project, you will need to download and print your labels!! Use the link below to download your free printable labels - and remember, if you have some white sticker/label paper go ahead and print on that!

One more quick note! This printable currently includes all of the Acrylograph Collections to date, but if you can’t find the label for a set you own - there are lots of blank labels included so that you can create your own!
How to Create Your Own Acrylograph Swatch Cards:
Are you ready to get your own Acrylograph collection organized??? Follow along with this video, or walk through the steps below to create your own easy-peasy Acrylograph swatch cards!
Step 1: Crop Your Cardstock
The first thing we need to do is to crop our cardstock down to the correct sizes for our little swatch cards!
For the full-sized 10 marker Acrylograph sets, we will crop our cardstock to 4.25 by 4.5 inches:

For the smaller 5 pen sets, we need to crop our cardstock down to 4.25 by 2.25ish inches (I say “ish” here because I found I like it to be slightly larger than 2.25” but smaller than 2.5”).

One great thing about these dimensions is that both cards are 4.25” wide, which means you can fit two side by side on a letter-sized piece of paper, so we will be able to use our cardstock as efficiently as possible.
Step 2: Score Your Cardstock
Next up we need to score our cardstock rectangles. These score lines will make it easier to create a clean fold when we fold our paper down to create our cards.
For this project I am using a “score board”, but if you don’t have anything like that, you can simply use a ruler or some other type of straight edge, and a bone folder (or some other type of blunt edge - I’ve totally used the dull edge of a butter knife to score cardstock in the past!)
Each card needs to be scored at 1.75 and 3.5 inches from the edge:

Be sure to score your cardstock so that the score lines are parallel to the shorter edge of your cardstock. Basically, with the bigger cards, you want the folded card to remain 4.5 inches wide, and with the smaller cards, you want the folded card to remain 2.5 inches wide.
Step 3: Fold
Now it’s time to fold our cards! Because of the score lines we made in the previous step, this will be super easy!
Fold each of your cards at the score marks. Start by folding the larger flap inward, and then fold the smaller side over the larger flap.

If you are using sticker/label paper for your labels you don’t need to fasten your fold together yet, we will use our label stickers to do that. If you using tape or glue to adhere your label, then go ahead and take a minute to add a piece of tape to your smaller flap to keep your fold closed.
Step 4: Prepare your Labels
Now that our cards are ready to be labeled, we need to get our labels ready to go!
There are two ways to prepare your swatch labels:
- You can cut out each label as you need it, and swatch out your colors after you have adhered it to your card.
- You can color your swatches before you cut out your label and adhere it to your card.

Actually, you MIGHT want to color in ALL of the swatches you own at once, and then cut them out once they are all fully colored - then they will all be ready to create all of your cards in one sitting!
For this project, I’ll be swatching out my glitter Acrylograph colors and then cutting them out once they are all ready to go.

A few notes about swatching:
- You can add your swatches in any order you’d like: perhaps you want to follow the order they came in in the original packaging, OR maybe you want to swatch them out in rainbow order like I did here!
- If my colors need a little more depth, I’ll go in a second time and add another color layer after the previous layer dries.
- Due to the sparkly nature of the Glitter Acrylographs, I find a second, or sometimes even a third layer makes a huge difference, so don’t be afraid to keep layering!
- As you swatch, if you notice your colors are scratchy or aren’t flowing smoothly, be sure to go check out this post on the Archer & Olive blog about how to make your Acrylographs best work for you.
However you choose to swatch, cutting out your labels is easy! Simply cut out each rectangle at the dashed cut line. Personally, I like to cut right inside of each line so that there are no cut lines showing on the final label.

Step 5: Adhere Your Label
Now that our label is ready it’s time to apply your swatch label to your card! We will be using our label to keep our fold closed, so attach the label to the side of your card where the folded flaps meet.
If you are using sticker/label paper, I find it helps to attach the sticky side of my label to the small flap first to get it all lined up. Once the placement feels right, you can fold the flap inward and press it all into place.

Once your label is adhered give it a few extra squeezes to make sure everything is fastened nice and tight.
If you are using glue or tape for this step, be sure to adhere the edges of your label carefully. This will help you avoid issues with your pen clips catching on your label as you attach and remove your pens.
Step 6: Attach Your Pens!
It’s time! This step is the easiest, and I think it’s also the most fun!
Following the same order as the swatches on your card, start clipping your pens into place:

After each pen is clipped, I also like to spin the body of the maker around. This way the swatch card shows on one side, and the pen labels themselves show when you flip it your set of pens over.
Your card should be the perfect size to fit all of your pens. So as you add each one, just make sure to keep them directly next to each other. Sometimes I find I need to do a little scooting as I go, which is no problem as long as my label is adhered nice and tight.

Once all of your pens are added, your pens are all collected together and your swatch/storage card is ready to go!

For the smaller pen sets, simply follow the exact same steps as above. Only this time, use the smaller rectangle. You can see the Vintage Heirloom swatch card in action below:

NOW your Acrylographs are all collected and organized together, and ready to be stored!
I love love love seeing all of my pretty colorful Acrylograph markers organized nice and tidy in their drawers!

If you don’t have drawers to fit your pens, or if you want some more ideas about how to store your Acrylographs - be sure to head over and check out this post about the Best Storage Ideas For The Archer And Olive Acrylograph Pens for some extra inspiration!
Oh! And one more thing that might be useful to you, ESPECIALLY if you are like me and you already have all of your Acrylograph collections mixed up together in one place: This post will give you a comprehensive list of all of the Acrylograph pen names and colors.
Now it's time to organize your own Acrylograph pen collection!
Ok friends! It’s your turn!!! I’d love to hear how YOU are storing your Acrylograph pens! Leave a comment below and let us know!
AND if you put these printable swatch labels to use I would LOVE to see them in action!! Find me over on Instagram at @shawnaclingerman and tag me there! Also make sure to tag @archerandolive, @archerandolive.community, and use the hashtags #AOShare and #archerandolive So that we can see all of your lovely Acrylograph Collections!
Happy swatching and organizing, friends!!!


0 comments