


Hey everyone! Amanda here from the Archer and Olive Ambassador Team and today I’m going to show you how you can use your bullet journal to create an easy, customizable, budget spread that you can use for every paycheck.
Budgeting can be a task of monumental proportions for most people. The are many different reasons. Sometimes you don’t want to confront your money (or you fear the lack of it), sometimes its because you simply don’t feel like it, and sometimes you have the motivation but none of the tools are just right. There are lots of expense trackers and budget trackers out there but there are very few you can customize to your very specific needs.
A little background
I first started budgeting in 2018 when I realized my spending was holding me back from living my best life. I had just started a new job in a new state and was spending to much money on frivolous things. I was terrified to look at my checking account because I didn’t want to see how little money I had. I found a budget printable online and faithfully began to track each paycheck. That free budget tracker definitely helped me track my monthly bills and expenses in those first months but it also included a bunch of fluff expenses built in that I didn’t need, and didn’t include other expenses that I wanted. I searched and searched to find the perfect budget worksheet but it just didn’t exist, so I figured out how to make one for myself.
Todays budget example that I’m going to share with you is very basic. It’s quick and easy to make and you can customize it to fit your specific budgeting needs. I use a version of this every paycheck myself so I know it works!
So lets get to making our budget!
Supplies Used
Caliographs (Summer 2023 Sunset Breeze)
First things first, choose your notebook. I personally use a travelers size for what I call my “life log” which includes my budget, but if you need more space feel free to use an A5, or if you need a lot more space a B5 or square would even work!
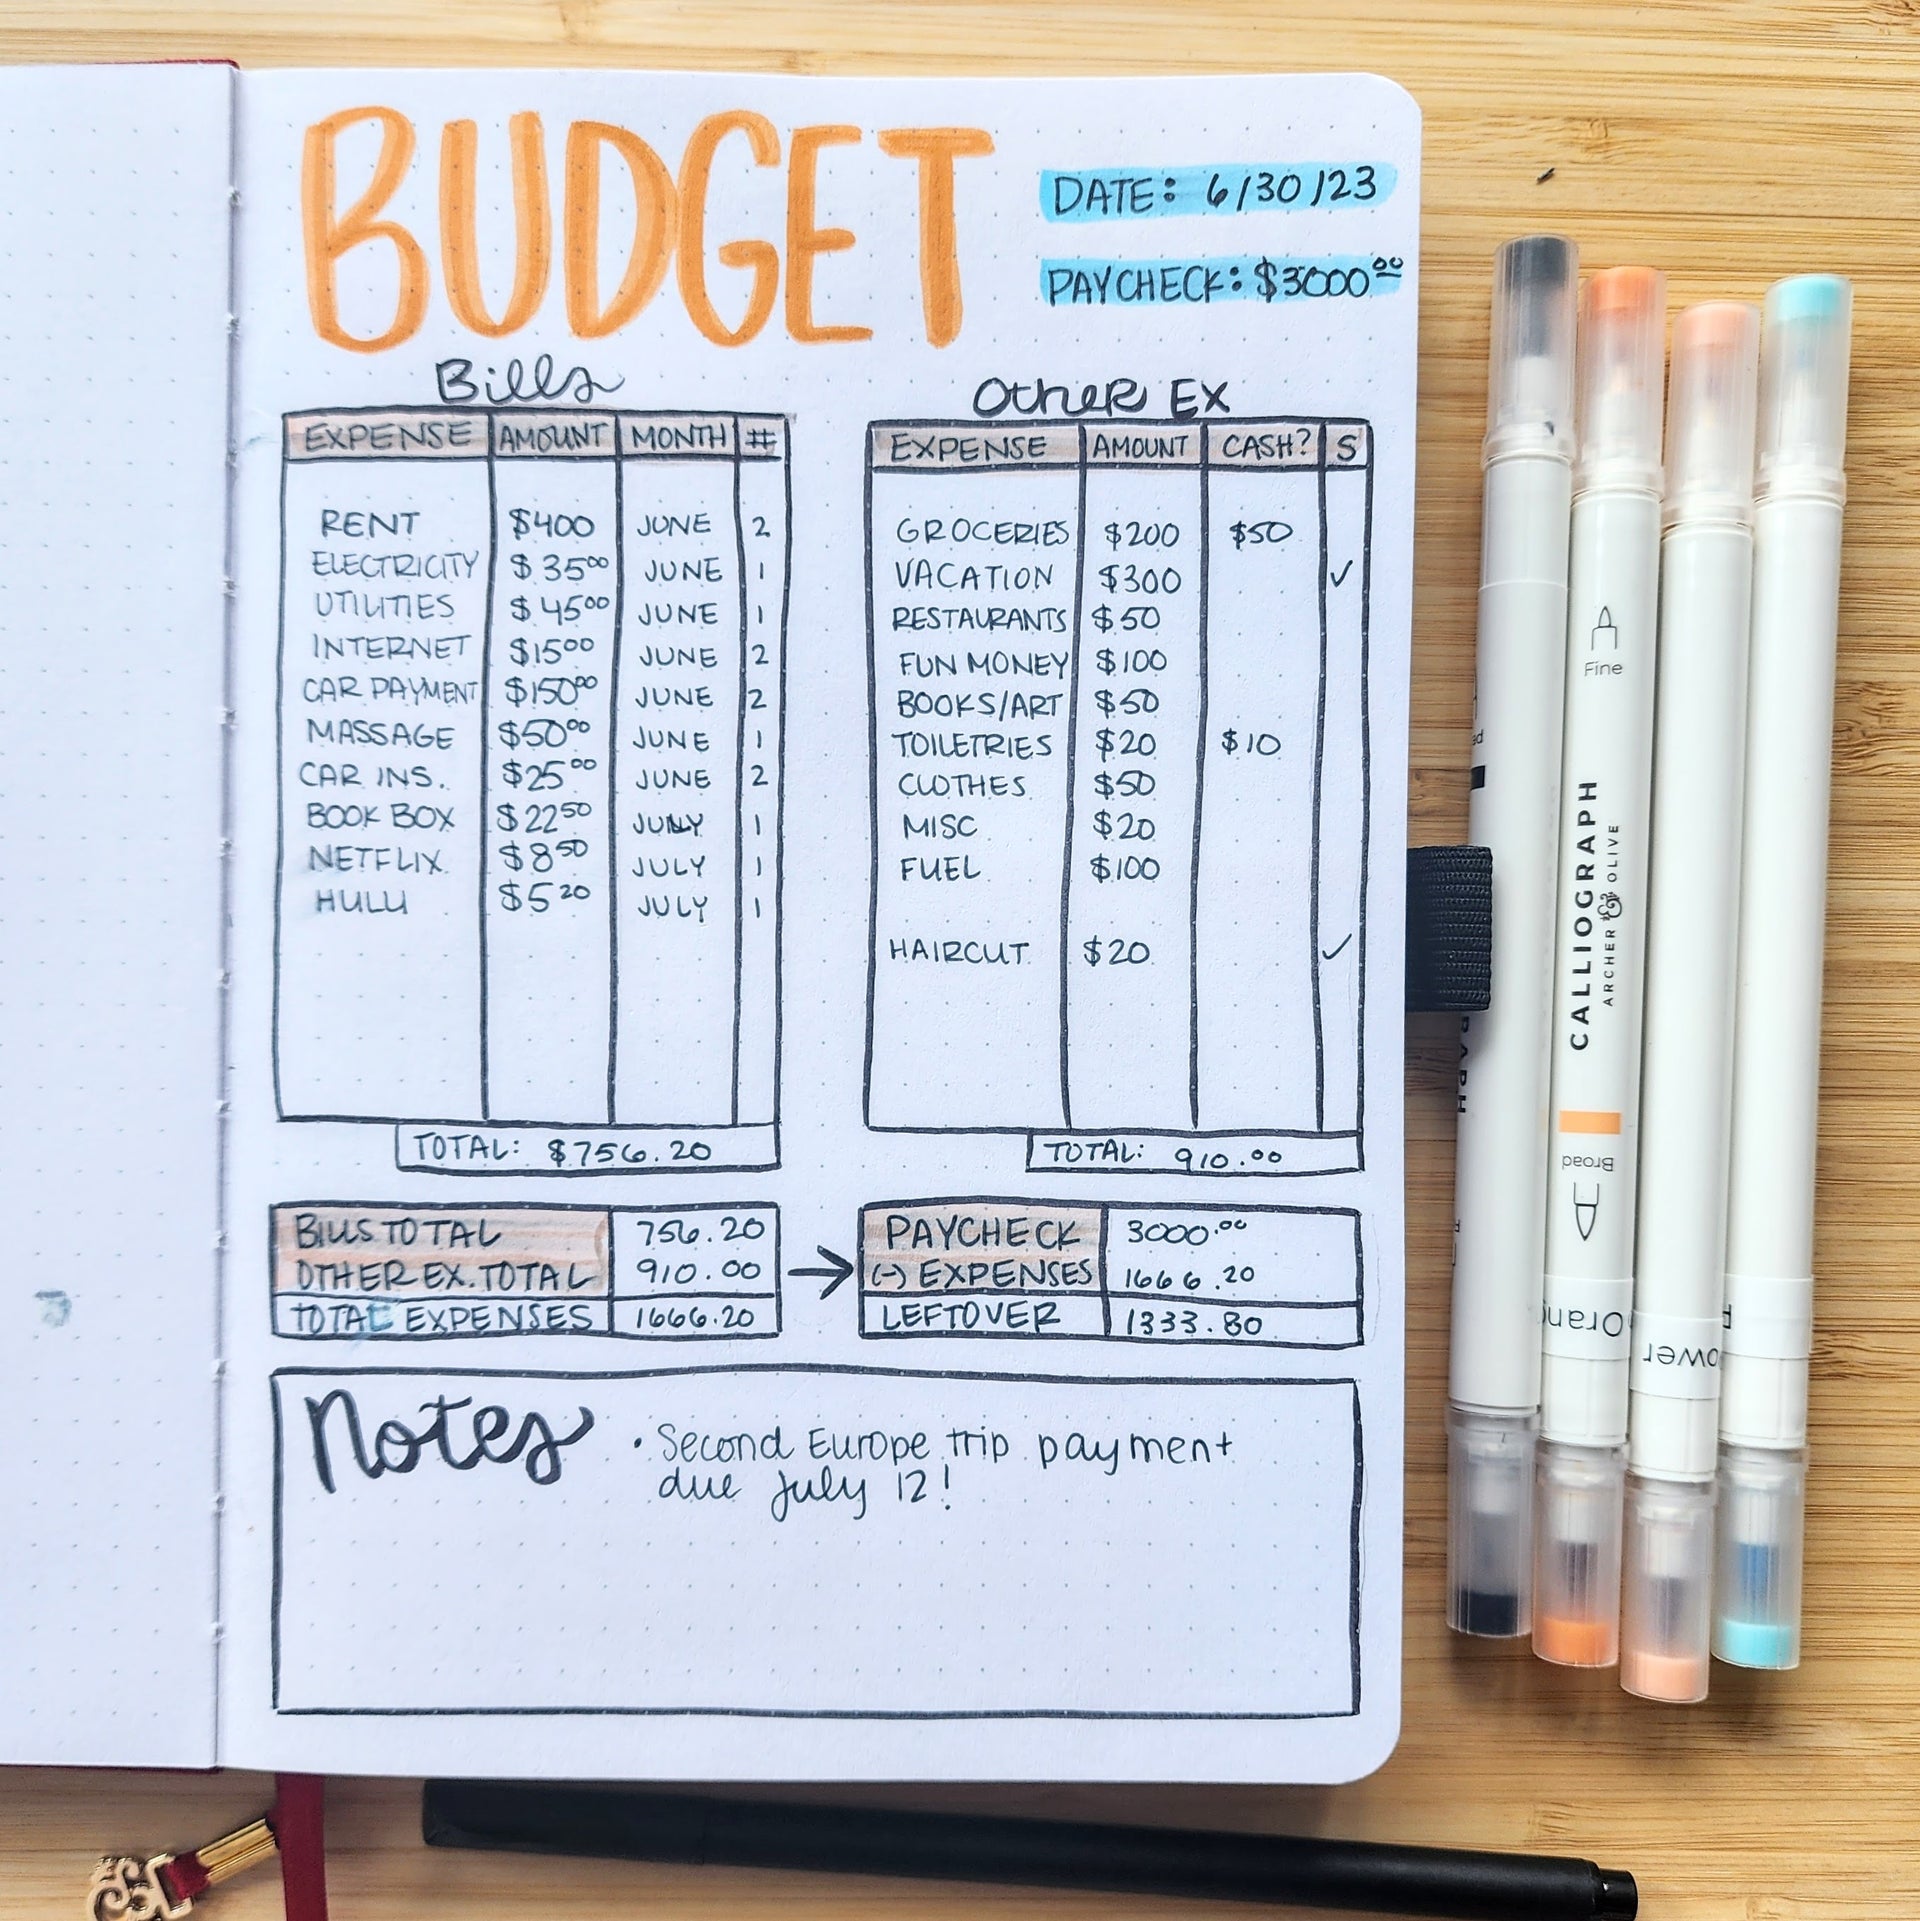
Next I want you to take a piece of scrap paper and write down all of your expenses, both bills and everyday life expenses. Anything you could spend money on in a month or need to save for. Make one column for your bills and recurring expenses (so Rent, Netflix, insurance, etc.), and make a second column for your variable expenses. These are categories like groceries, fuel for your car, clothing, toiletries, and anything you’re saving for (such as vacation).
Do you have your list complete? Great! Now you can use that list to know exactly how big you need to make your “budget boxes.” The budget boxes are the part of the layout where you’re going to put all your expenses. This layout includes two boxes. The one on the left is for those bills and recurring expenses and the one on the right is for your variable expenses as well as any one time expenses that might pop up. Make sure to give yourself enough space! Give yourself enough lines for everything on your list plus a couple extras on the bottom just in case something else pops up.

EXPLAINING THE BILLS BOX:
- I have the first line in the bills box spilt into different sections. First is the name of the expense followed by the amount you’re budgeting for that expense this paycheck. The last two sections are “month” and “#.” These sections exist because I get paid bi-weekly. Because of this I like to split the amount I owe for each expense in half, allocating half of the funds from each paycheck. The month section helps me to know what month that payment is going for and the “#” helps me to know if this is the first or second time I’ve set money aside for that expense. This can also be adapted for bills that you pay less frequently and have more months to save for.
EXPLAINING THE OTHER EXPENSES BOX:
- Because the expenses in this box are variable the sections at the top are slightly different from the bills box. You may not need all the sections in this example or you may need different ones. Feel free to swap and change as needed. In the case of this example the first section is again the name of the expense and the second is the amount I’m budgeting. The third section is titled “Cash?” This I would use if I were taking cash out of that specific part of my budget so I would know how much I need to withdraw and how much I still should have in my account for card use. The last section is titled “S,” this stands for savings. I put a checkmark here if I am going to be transferring the amount budgeted into my savings instead of leaving it in checking.
At the bottom of each budget box is a final line where you add up how much is budgeted/designated from each box. You are going to then take this to the next section which I call “Totals Boxes.”
In my example the box on the left if where you are going to add up the totals from each of your budget boxes. You are then going to take that combined total to the box on the right and subtract it from the money you made in your paycheck. Whatever is left is the money I know I can put into savings for an emergency fund, put towards debt, whatever I may need it for.

The final section on my budget is notes. I use this section to remind myself of upcoming payments, Special payments I need to consider, any extra funds I may have in my account like birthday money, or I also use it to make a note of the day I transferred budgeted funds to savings so my ADHD brain doesn’t accidentally transfer money twice or forget to do it at all.
Ways you can customize this layout:
-PAYCHECK: You’ll notice in the top right corner I have a space for paycheck and the amount. Maybe you have multiple streams of income, or maybe you’re married and you put yours and your spouses incomes on the same budget. Lines can be moved or squished together so you can put what you need there
- BUDGET BOXES: As I stated before the section names at the top of both these boxes are entirely customizable to each of your needs. Maybe you only get paid once a month so the whole “month” and “#” part are unneeded. You definitely don’t need to have 4 sections in the box, so if you only need two than feel free to only make two. That’s totally fine!
-TOTALS BOXES: Going off of the paycheck note before, in the example I only have space for one paycheck in the right box. If you have more than one income stream feel free to add more! You want to make sure to budget every dollar so do what you need to do!
-NOTES: Want a bigger notes section? Don’t need a notes section? That’s cool. Grow or shrink it as needed.

So what do you think? I hope that you were able to find at least some element today to help make budgeting a little easier!
If you would like to see how I freehanded the A5 layout above and here more about the process I also made a video for the Archer and Olive Youtube channel which you can find below.
In addition to the video showing you how I made my budget layout I’ve also made a savings tracker printable for you! It’s a perfect chart to use to help you save for your next big purchase. Whether it be a vacation, a new phone, or so you can splurge on the next A&O release!

Thank you so much for reading this blog today. If you would like some more budgeting inspiration here are some more posts on the Archer and Olive blog you may find useful.
Creating A Budget During A Crisis + Free Printable! by Nicola
How To Track Your Finances In 2023 Like A BOSS | Bullet Journal Edition by Vero
How To Use The Snowball Debt Relief Method In Your Bullet Journal To Become Debt-Free by Ericka


0 comments