


It’s a total pain getting to the end of your journal only to realise you don’t have enough space to fit everything in. Being just a few spreads shy of getting all the layouts your want in your notebook can be really frustrating. How can we save ourselves this heartache? This is where pre-planning can help, and I’ve got an easy step-by-step process to help you make sure everything fits!

Making it all fit
Hi team! Jess or JashiiCorrin from YouTube / Instagram here talking about...math. Now don’t run away just yet! I know for some, the idea of have to do a “calculation” is a bit of a turn off, but the easy process I’m covering in this blog post is going to save you so much frustration when it comes to the end of your journal.
In this process, we’re aiming to:
- Figure out how many pages are needed for what we want to include in our notebook, and
- Compare this to how many pages our notebook actually has.
We have two different approaches here; the easy way, and the SUPER easy way (unsurprisingly, I’m all about the second one). In the first one, I’ll take you through how to do these calculations on paper (with a calculator of course), while in the second option, we’re going to get the computer to do the math for us.

Supplies
It pays to be prepared, so it’s time to grab some supplies! I used the equipment below which you may also find helpful. Remember you can use my code JASHIICORRIN10 for 10% your orders at Archer and Olive; we love savings!
- A5 Archer and Olive notebook - need to know how many pages we’re working with!
- A5 Archer and Olive notepad - good for our messy notes
- Pen or pencil of choice
- A calculator or the free downloadable (find that one below!)
Rather watch, then read? For a quick overview of how to plan your journal to fit everything in, check out the video below!
Before you start…
It’s a lot easier to figure out whether things are going to fit into your journal if you already have an idea of what you want to include. I’ve got a separate video that talks through the process of how to plan your best journal yet, but if you’ve already got your pages in mind, let’s go!
Method 1 - I can math
If you’re not afraid of doing some math, then this option is great for you! You’ll need your pen or pencil (or both), paper, and calculator. We’re going to start by drawing out the layout of our page to make our calculating easy.
Setting up the page
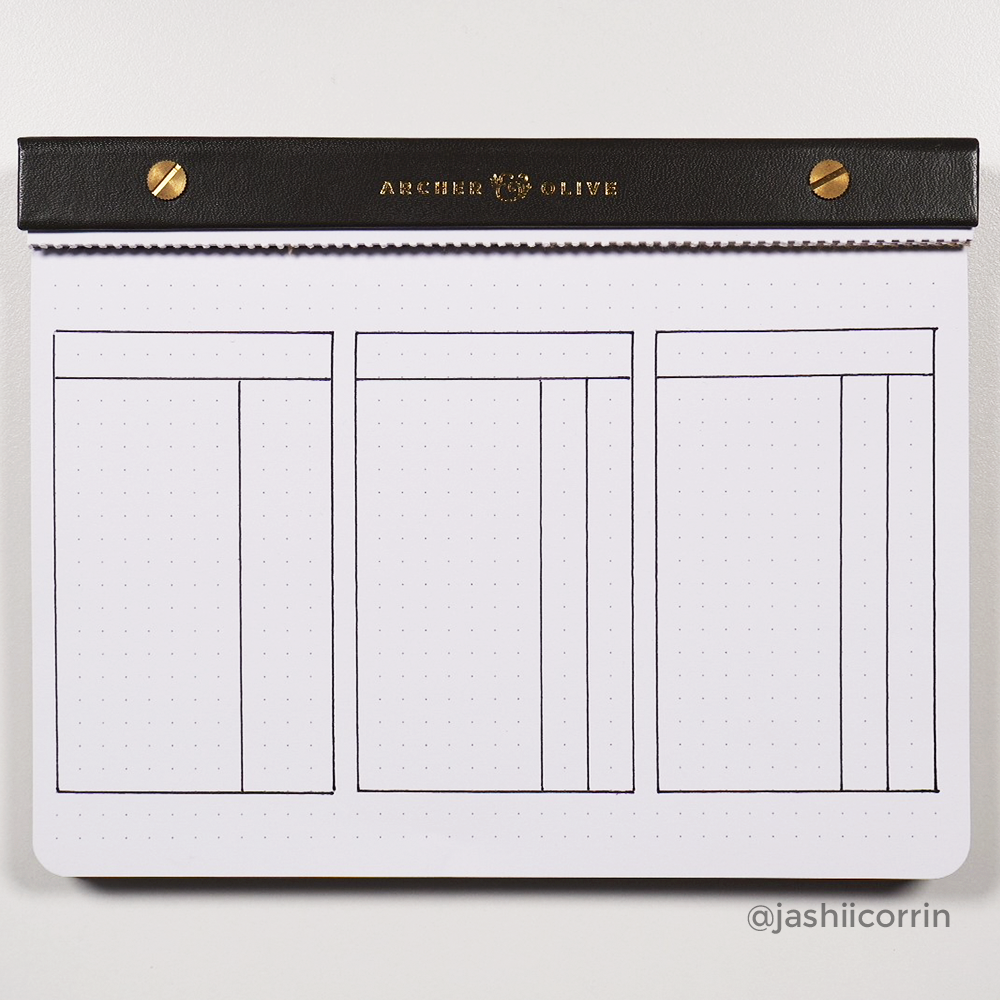
The calculation page has three main sections:
- The left-hand section for any start-of-journal, or one-off layouts
- The middle section for any monthly layouts
- The right-hand section for any weekly layouts
The picture below can help you set this up for yourself. Note that the left-hand section has 2 columns, while the other sections have 3 columns. The columns don’t have to be specifically the sizes I’ve picked, but I do recommend making the left-most column in each section wider (we’ll be writing layout titles in there). I’ve also left some space at the bottom for the final steps in our calculation process.
When it comes to populating the calculation page, there are two ways we can approach it:
- I have this size journal, how many layouts can I fit?
- I want these layouts, what size journal should I use?
We’re going to focus on the second option for our calculating here, but the process will work for the first as well!
Start-of-journal and one-off layouts
To populate the left-hand section, start by listing out all of the layouts you’ll want in your start of journal setup. This could be a future log, year at a glance, goals pages, things to check out, whatever you want! We’re going to write down all those page headings in the left-hand column.
In this space, you can also list out any other one-off layouts or pages in the journal that you know ahead of time that you’ll want. This could include a pen-testing page in the back of your journal, or maybe you don’t like to use the very first page in your notebook. Make sure to note those down too!

Once all those layout headings are listed out, then we need consider how many pages each layout will take up. Our calculations here are page-based rather than spread-based, so if a layout is going to take up a full spread, make sure to list it as 2 pages. Go through each of the layouts you’ve listed out and write down how many pages they will take up in your notebook.

Time for the math! For this one we just need to add up each of the page numbers we’ve written down so far. Feel free to use a calculator, I always do! I’ve mis-numbered my monthly logs often enough that I don’t trust myself for most simple addition… Once you’ve got that page total though, jot it down at the bottom of the section for safekeeping.

Monthly layouts
Populating the middle section of our calculation page has a similar process to the first one:
- Listing out the layouts you want to include each month
- Noting the number of pages they each take up
- Adding up the total pages
But we don’t want to write these out for every single month separately, especially if you use similar layouts with each monthly setup! Instead, to start filling out this section, first note down how many months you’re looking to fit in the journal. I’ve written this at the top of the section as well need it when we get to our calculating step.

Now we can list out all of the layouts we want to have with each monthly setup. This can include things like a monthly log, habit tracker, challenge pages, or whatever else you typically like to use in your monthly setups.
Similar to before, once you have those layout headings, note down how many pages each of them take up. These page numbers get listed in the middle column, as shown in the picture below, leaving the last column empty (but not for long!)

The calculation we’re doing for this section has two steps:
- Calculate the number of pages needed for each layout type
- Calculate the number of monthly pages needed total
In the first step, we’re populating that empty column. This calculation uses the simple formula of:
Number of pages needed for a layout x Number of months in the journal = Pages total
For instance, if your monthly log normally takes up 2 pages, and you want to fit 6 months in your journal, 2 x 6 gives us 12 pages of space taken up in your new journal by monthly logs. Do this calculation for each of the layouts you listed in this section.
The second calculation step in this section is adding up all of those pages in the right-most column to find the total number of pages used by your typical monthly setups. Write that number at the bottom of the section for safekeeping.

Weekly layouts
With the one-off and monthly layouts considered, it’s time to think about the weekly pages! If you don’t use weekly pages in your journal, but you do use dailies, the approach to this section is much the same. The general steps are going to be:
- Specify the number of pages used per week
- Figure out the number of weeks you want to include
- Calculate the number of pages required
To start, we need to consider how many pages you use in a typical week. This will include any of your weekly log and daily log layouts, specifying how many pages on average you use for those. Remember here that a weekly “spread” takes up two individual pages!

For each of the months you want to house in your journal, we need to figure out how many weeks are in each. Thankfully this is super easy by just looking over a calendar and counting the individual weeks within them. We can use this information to populate our first two columns in this section with:
- The months you’re including, and
- The number of weeks in each month

Bring on the math! Taking a similar approach to the monthly pages, our calculation here has two steps:
- Calculate the number of pages needed for month’s weeklies
- Calculate the number of monthly pages needed total
In the first step, we’re populating that third column. This calculation uses the simple formula of:
Number of pages needed for each week x Number of weeks in the month = Pages total
For instance, if your weekly log normally takes up 2 pages, and there are 4 weeklies to be put in January, 2 x 4 gives us 8 pages of space taken up in your new journal for the weekly layouts in January. Do this calculation for each of the months you listed in this section.
The second calculation step in this section is adding up all of those pages in the right-most column to find the total number of pages used by your typical weekly setups. Write that number at the bottom of the section for safekeeping.
Calculating the amount of space
By this point, all of the hard work is done! You’ve got your sub-totals for the start of journal or one-off pages, the monthly pages and the weekly pages. All we have to do is add them together! This total number can then be used to find a journal that will have enough pages to accommodate all your layouts, or see if there’s enough space in the journal you’ve selected

Help! There’s not enough space!
Don’t worry if you’re a few pages shy in your journal for being able to fit everything in! This is a GREAT excuse for a tip-in. To find out more about tip-ins, you can check out my previous blog post on that topic, or this helpful video about how you can use them to add pages to your notebook.

Method 2 - ASAP (as simple as possible)
If math puts you off, don’t worry! We can get the computer to do the calculating for us with just some simple inputs. For this method though, you’re going to want to grab the free Google Sheets calculator that we have below (just click on the image for it!)

You’ll see that this one is set up in a VERY similar way to the do-it-yourself process we talked about above, so the steps are going to be the same, just with less DIY math!
Setting up the calculator
Starting at the top of the page, there are some sections we need to fill in:
- Pages in notebook: fill in with the number of pages your notebook has (e.g. 160 or 192 or a typical Archer & Olive A5 notebook)
- Number of months: the number of months you want to fit in your notebook
- Pages per week: how many pages you typically use each week in your notebook
These values are going to help the calculator figure out how many pages total you’ll need for what you want to include. The other sections of “pages accounted for” and “pages remaining” will update automatically as we populate the next section.

Start-of-journal and one-off layouts
To populate the left-hand section:
- In the first column, list the headings for any start of journal layouts you’ll want
- Also in the first column, list any other one-off layouts that you’ll want
- In the second column, specify how many pages each layout will take up
As you populate this (the page numbers in particular) the calculator will work out for you how much space you’ve accounted for, and thus how many pages are left in your journal of choice.

Monthly layouts
Our monthly section population has a similar series of steps:
- In the first column, list the headings for any layout you typically include in a monthly setup
- In the second column, specify how many pages each layout type normally takes up each month
Again, as you populate, the page totals will update automatically; super easy! This calculation uses the number of months we listed in that “number of months” section at the top. If you want to change how many months are included (just in case you have more or less space leftover at the end) all you need to do is update the number in that box. The calculation carries that change through for you.

Weekly layouts
With the one-off and monthly layouts considered, it’s time to think about the weekly pages! Our steps here are to:
- In the first column, list the months that your journal will include
- In the second column, specify how many weeks are in each of those months
The calculation step is again done for us using the “pages per week” value we put in at the top.

Playing around with space
The nice part about the calculator is that is makes playing around easy! Tweak your listed layouts and values to get the most out of your journal space (or make things fit). And if you find you need a little extra space to fit your year, check out my blog on Tip Ins
Whether you go with the DIY math route, or decide to use the calculator, planning things out ahead of time can help you save the heartache that comes with running out of space! Let me know how you get on with your new journal calculations over on Instagram by tagging or messaging me, @jashiicorrin. Bring on our new journal setups!


3 comments
This is amazing, it has helped me start a Bullet Journal after procrastinating for years.
Hi, I just used the spreadsheet to check my planner for the next six months and it was AMAZING. I will definitely be using it again in June to plan for the second half of the year.