

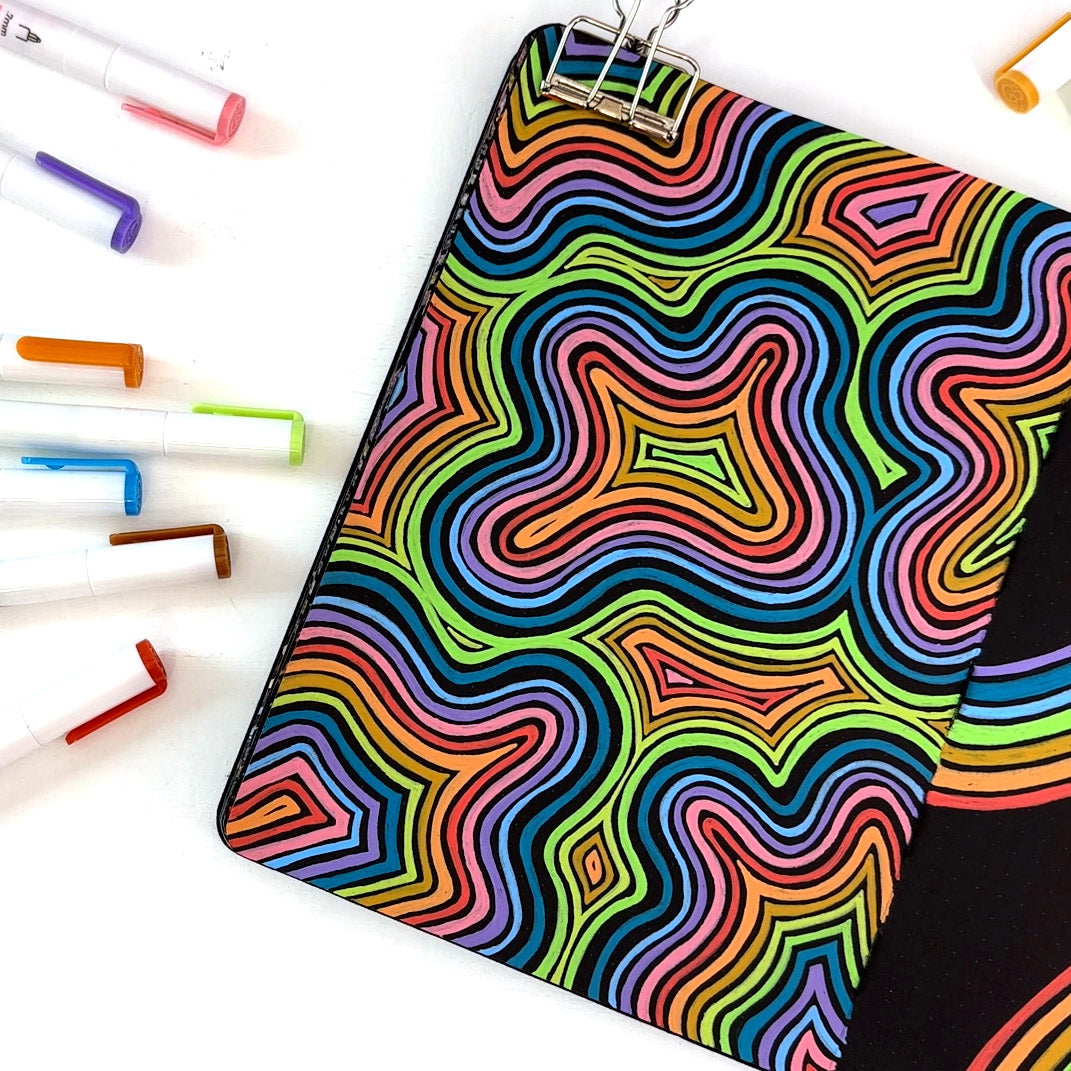

Are you looking for the perfect mindful drawing activity? Well, then might I suggest drawing some abstract pattern art! Shawna Clingerman here (@shawnaclingerman on IG and YouTube) and I can’t wait to walk you through this easy step-by-step tutorial about how to easily create abstract patterns without a lot of thought! You are going to be amazed at how easy it is to take simple easy-to-draw shapes and turn them into amazing abstract art!

Supplies For Creating Your Own Abstract Pattern Art:
One of my favorite things about this activity is that you can do it anywhere! (I’m rather partial to the couch or my bed, but I’m not going to lie: I’ve even been known to take this project with me when I go out!)
Here is everything you need for this activity:
- Archer & Olive Blackout Dot Grid Notebook (I’ll be working in an A5 journal, but any size will work just fine, and if you’d rather you can use a notebook with white pages instead!)
- Archer & Olive Acrylographs: (for this project, I’m using the Blossom Collection with a 0.7mm Tip)
- Any piece of paper for priming and wiping your pens: You could use a spare piece of paper from an Archer & Olive Notepad, or you could do what I often do and use a sticky note instead!
Don’t forget! You can save 10% on your purchase at Archer & Olive using coupon code Shawna10!
Note: Some of the links in this post are affiliate links - this means if you go through them to make a purchase, I might earn a small commission at no cost to you!

Why I Love Creating Abstract Pattern Art:
When I started drawing abstract patterns in my journal, I had no idea what I was going to create. I was experiencing a lot of stress in my life, so I picked up my Blackout Notebook and Acrylograph Pens with the intention of finding an easy creative practice that I could do anywhere with out much thought. As I started mindfully drawing shapes and lines, I was quickly hooked! I could focus my attention on the simplicity of line and shape, without worrying about what it would look like or my final result. In the end though, what I ended up with was something that felt really special! This activity has become a regular practice for me. Today I reach for my blackout book and acrylographs again and again, and this practice that started out as a simple coping strategy has become a journal filled with page after page of detailed, vibrant, abstract patterns!
How to Create Your Own Abstract Patterns:
Are you ready to start drawing your own abstract patterns? Follow along with me in the video below, and/or use the written instructions below the video to go through the process step by step!
Start with Simple Shapes
Each abstract pattern I create starts with simple basic shapes and then builds into something much more interesting and complex. Here are a few of the shapes I choose from when I start to create...
Starting with an arc:
Using an arc as your starting shape is the perfect example to start with. We have all seen the way that this simple shape is the base for one of the world’s favorite things: RAINBOWS!!!
When we draw a rainbow, we start with a big arc and then layer different colored arcs below:

It is a beautiful thing! This is totally a concept we can bring to other shapes to start creating patterns that more abstract.
Starting with a wavy line:
A wavy line is another great way to start your abstract pattern page! Simply draw a wobbly/wavy line and then using the same concept of layering lines of color above and below our wave, with this simple concept you can created some pretty amazing designs!

Starting with a wonky circle shape:
This is the concept we are going to use for our project today, and it is a favorite that I come back to again and again and again! This pattern starts with simply drawing a few wonky shapes, and then once again, with the magic of building out from our original lines - we end up with something quite amazing!

Starting with an “edge wave”:
I’m not quite sure what to call this design, but this example sort of combines the idea of a wonky shape and the idea of a wave. For this design, we simply start with a wavy/wonky line, but we draw it across the edge or corner of the page. Now when we layer our lines above and/or below we get a slightly different effect! I’m especially partial to what happens when I start with something like this on my page.

A Note About Working with your Acrylograph Pens:
A quick note before we move forward with the actual pattern drawing. Remember that sticky note/scratch paper from our supplies list??? We are going to be using that throughout our project to prep and clean off our pens!

As I’m working I make sure to prep each Acrylograph by priming it on my sticky note before I start to draw. Then, throughout the process, if the lines are scratchy, or the ink isn’t flowing freely, I will use my scratch paper to prime my pen some more, and/or gently roll my pen tip around to clean any dried ink off the nib of my pen.
If you are struggling with your Acrylographs and the ink isn’t flowing smoothly, be sure to check out this article on the Archer & Olive blog because this project is SO MUCH more fun when you and your Acrylographs are friends!
Drawing Your Own Abstract Pattern Page:
Step-by-Step Instructions:
Now that we understand the idea of starting with simple shapes, and how to make friends with our Acrylographs let’s dive in!
Here are the steps I used for today’s page:
1) Draw some wonky shapes:
First things first, we have to break up this page with some starter shapes! We are going to use the “wonky circle shapes” for today’s project.
Using the same color, draw some wonky shapes around your page. You don’t need to fill all of the space (we will be doing that later!) but you do want to (somewhat) evenly distribute the shapes on your page:

For my page I drew five shapes: one in the center, and then four around it, going off the edges of the page.
2) Thicken your lines:
Once we have our main shapes drawn, we are going to use the same color we started with to go back in and add some thickness to the lines on each of our shapes.
This step is helpful for 2 reasons:
- It adds more visual impact and takes up a bit more space on your page.
- This step gives you the opportunity to clean up your lines and/or fix any mistakes with your shapes! That means if a curve is off, if your lines are shaky, or if your lines didn’t meet perfectly when drawing your original shapes, you can thicken your lines to fix it all, and you will finish this step with a beautiful shape!

3) Add your second color:
Now that we have our base shapes in place, all we have to do is start building! We are going to start building OUT, one color at a time, from each of our existing shapes.
Since I’m a big fan of the rainbow, and we are building outward, I’ll be choosing my colors in reverse rainbow order…

…so using a light blue, we are going to simply draw a line that is slightly outside of our existing shapes:
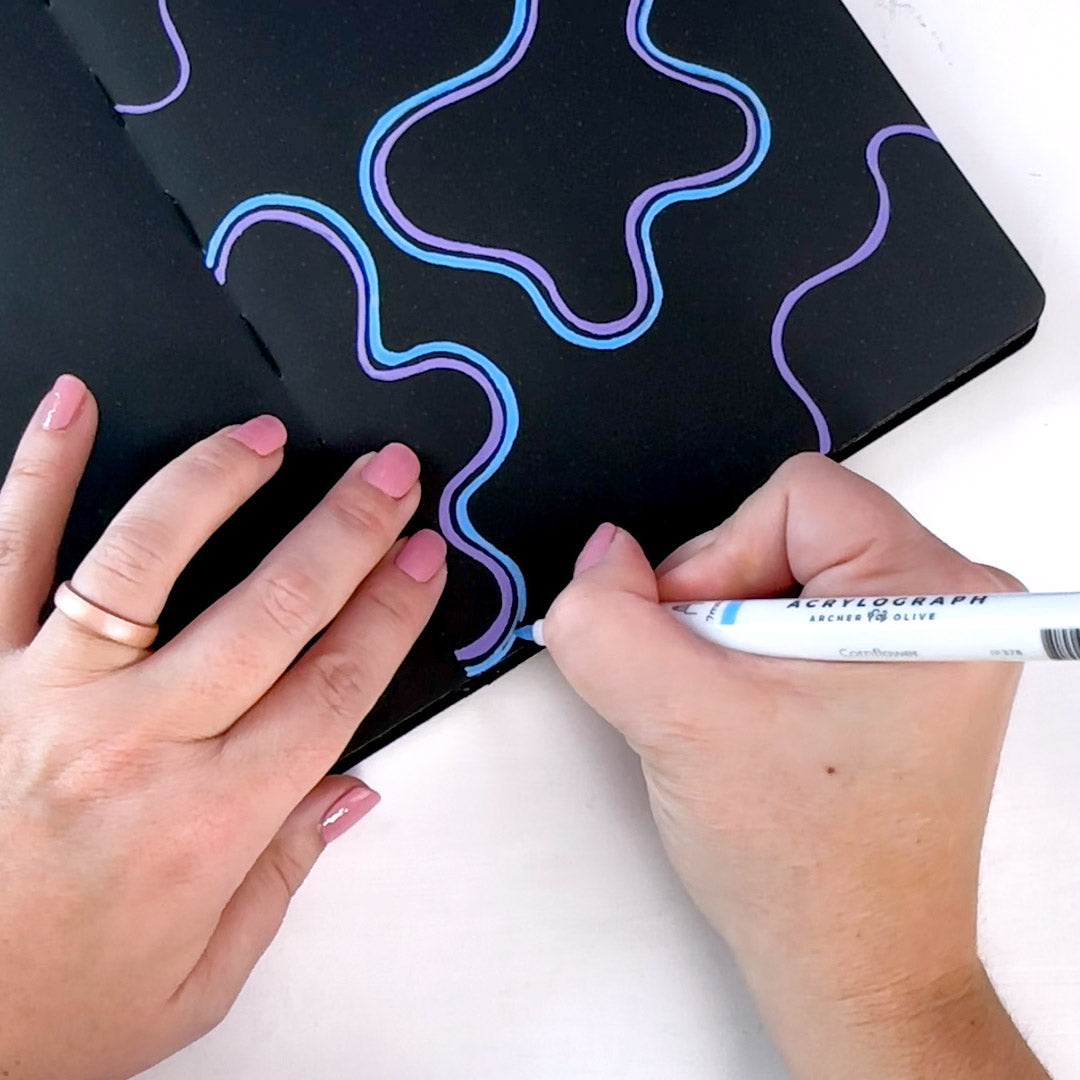
As you start drawing the main thing you have to think about for this step is space: Choose a distance from the line of your original shape, and try to stay somewhat consistent as you follow along the line, all the way around the shape.
Don’t stress, friends! This does not have to be perfect. But here are a few other things that can help you along the way:
- Draw in shorter line strokes for more control as you draw.
- Go slowly, this is not the sort of project you can rush through to the end.
- Finally, remember that thickening your line can remedy a world of problems. So be thoughtful as you add thickness, using this step to fix any issues with your shapes.
Use the techniques above to add that second color to the outside of each of your original shapes.
3) Keep building out:
You guessed it! We are going to continue building, one color at a time until we fill up ALL of the space outside our original shapes.
Don’t worry too much about the spacing between each color layer, or the thickness of each line. Sometimes a little bit of variety in your spacing and line with can be fun! The only thing that I try to keep consistent is the distance between the current line and the previous line. Other than that, I just let my mood/whim guide me as I create!

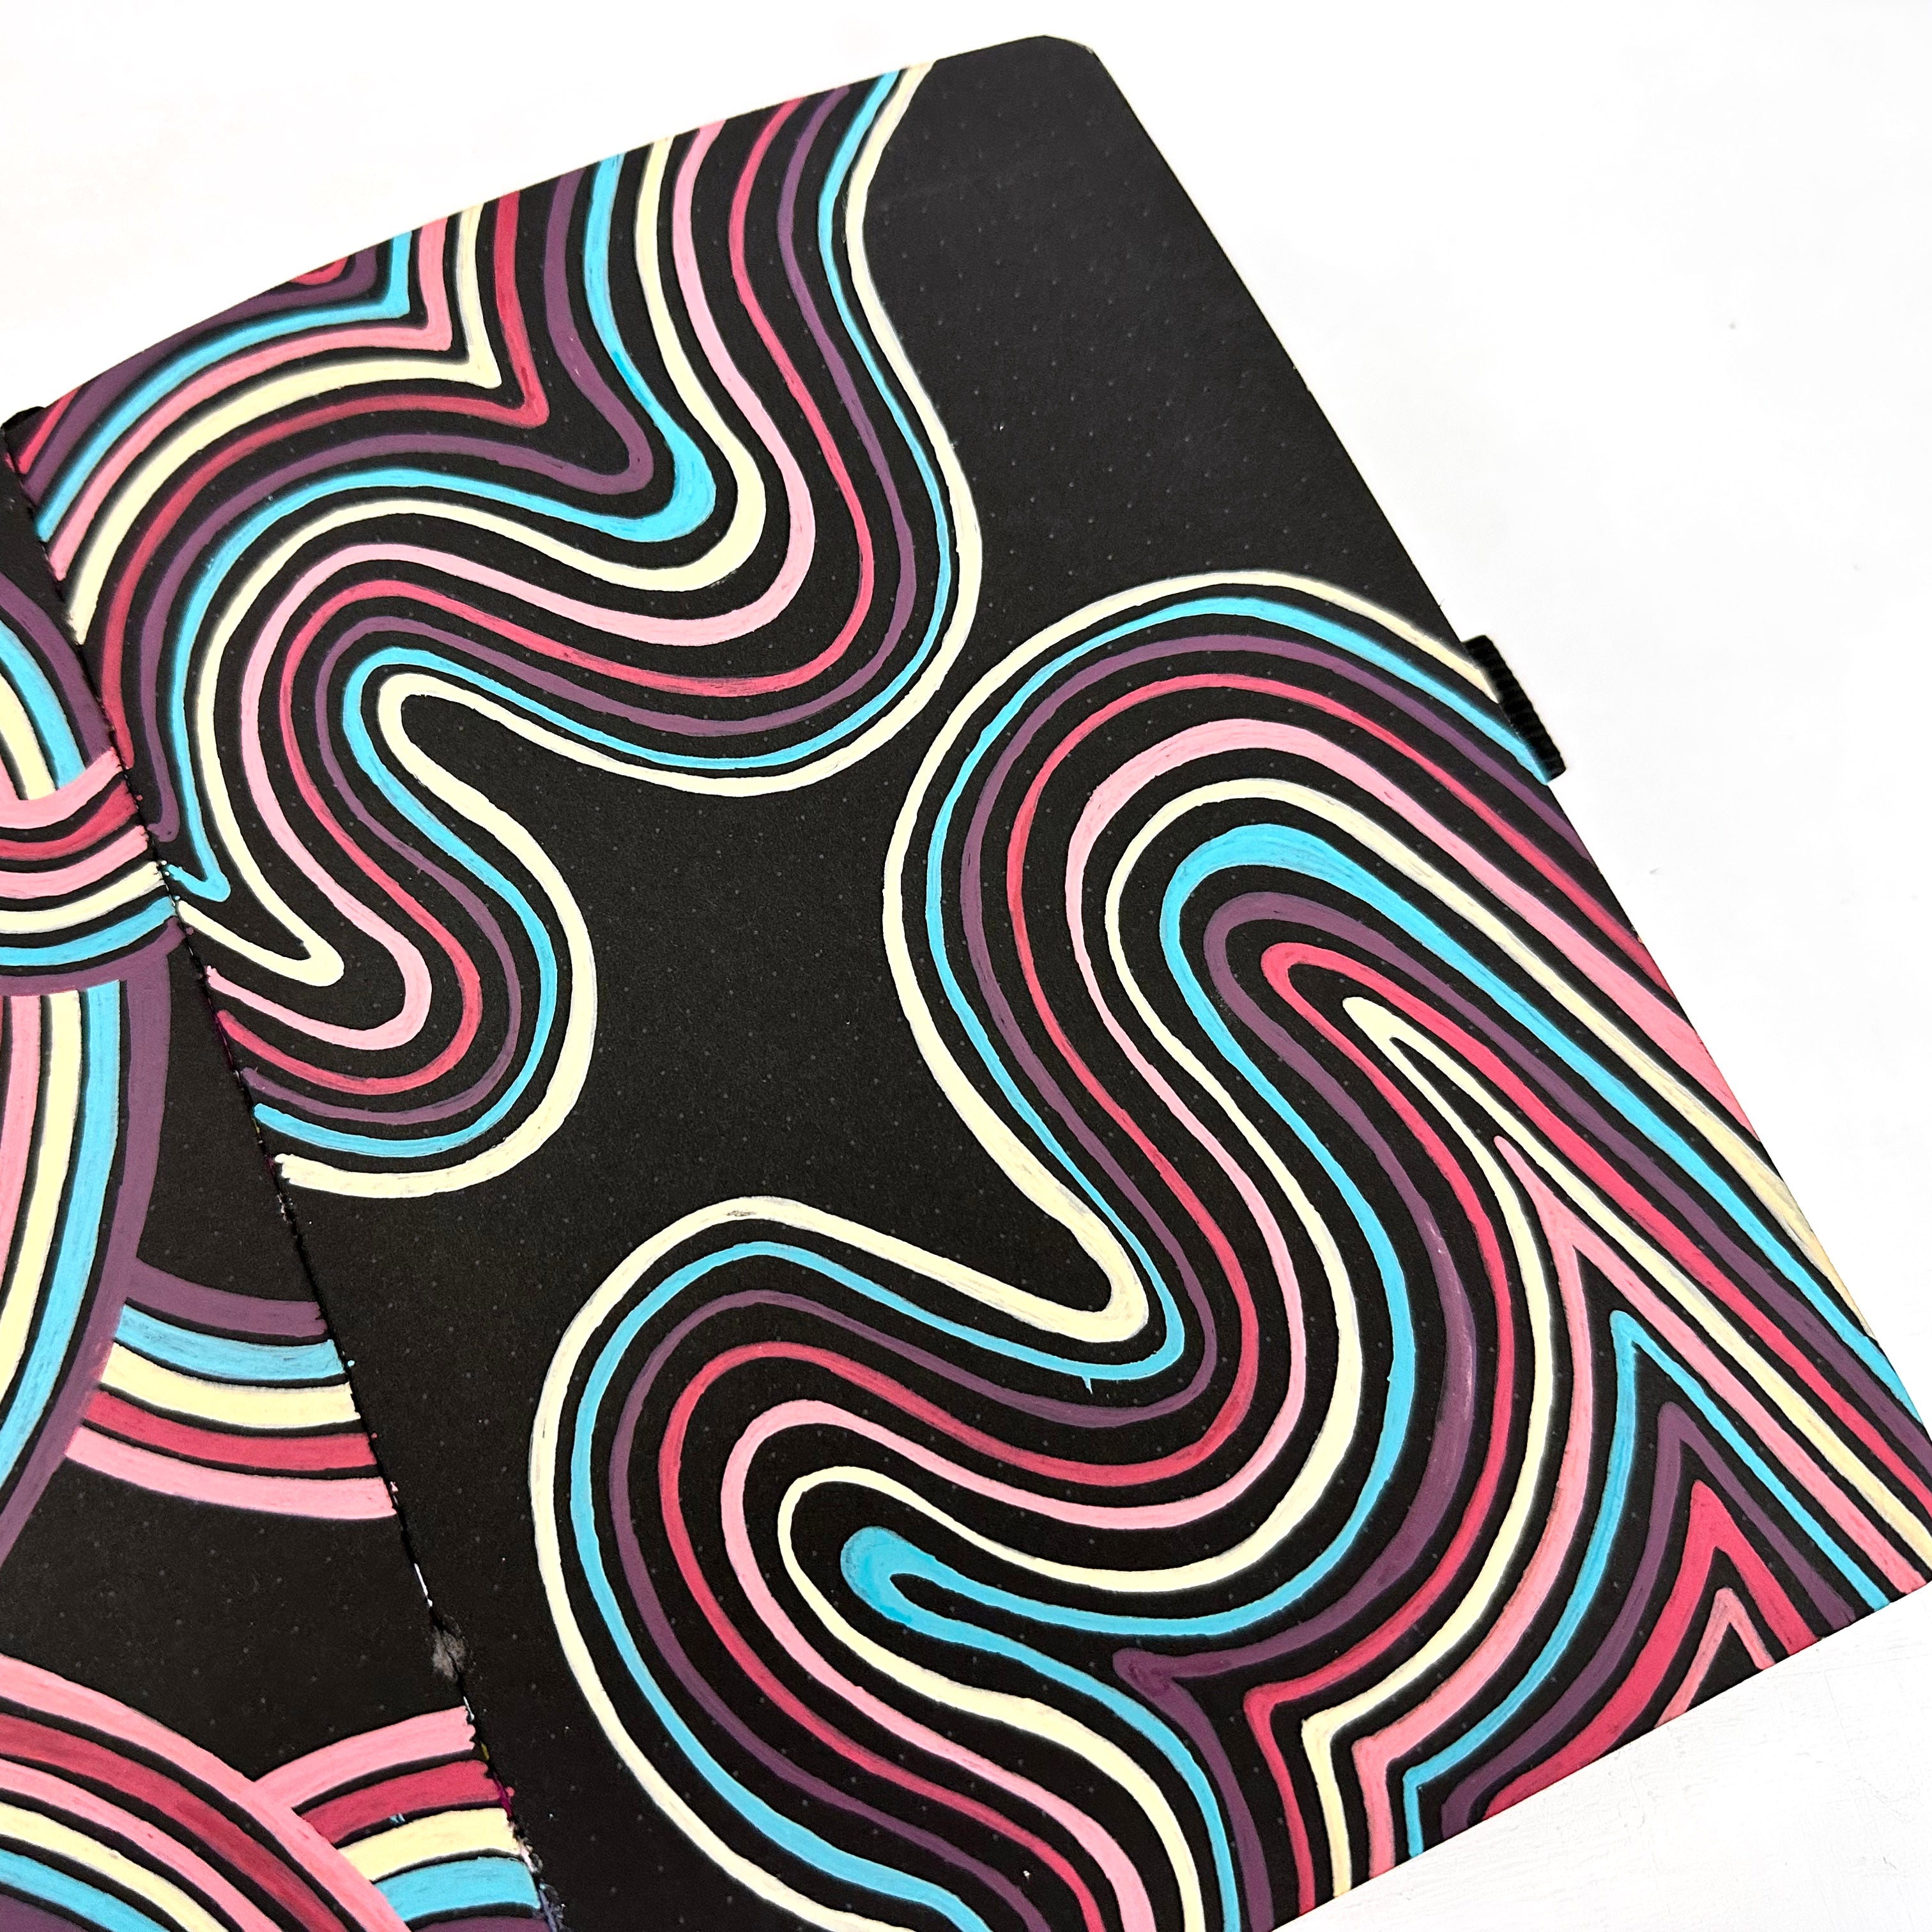
As you start adding lines and building outward from your shapes, your lines will naturally start to connect. When this happens, all you have to do is simply keep your line spacing consistent, and treat the places where they connect as a newer/bigger shape:

One color at a time, your abstract pattern begins to take shape:

As you draw, you will start to notice that each new color layer is quicker and quicker to create as the spaces to fill outside of your original shapes starts to shrink:

…until you have filled up all of that outside space!
4) Fill in the space inside your original shapes:
Once you have filled in all of the spaces outside of your original wonky circle shapes, those middles are going to look like a whole lot of empty space.
So, NOW we are going to start building inward, and this time we are going to use rainbow order (not reversed) so that our colors can follow the same rainbow pattern:

Once again, we are going to follow the exact same steps:
- Drawing a line with equal distance to the previous line - all around the inside of each shape.
- Thickening that line (as you thicken, you can remedy any problems/mistakes).
- And then moving on tho the next color, again and again, and again.

5) Just keep going until you are done:
Just keep going…. and going… and going… and going some more. These pages always take me HOURS, days sometimes even! So give yourself time, move slowly, and enjoy the mindful process of drawing each colorful line - one little stroke at a time.

Eventually, you will have no more spaces left to fill and your abstract Acrylograph pattern will be done!
Finished Abstract Pattern Art Spread:
The beauty of this process is that you can use this same technique (draw shapes, draw lines, and then build, build, build) to create lots of different types of abstract patterns! So start with this one, and then see what other shapes and patterns are calling your name!!!
Free Printable:
Because I really want you to try this practice, I thought why not make this as easy as possible by giving you a free printable guide!
Use the following download to give you some starter shapes and layout ideas to help get you started:

Ok, friends! It’s time to start drawing!!!
Are you itching to start drawing your own abstract patterns? Well go right ahead! There’s no need to wait!
I would LOVE to see YOUR abstract patterns! Find me over on Instagram at @shawnaclingerman and be sure to tag me there! Also make sure to tag @archerandolive, and use the hashtags #AOShare and #archerandolive So that we can see all the lovely abstract goodness that you create!
Until next time, happy abstract drawing friends!!!


1 comment
I love this, Shawna!! Thanks for the tutorial. Can’t wait to try this out!