


Hello, friends! Elizabeth here from Plant Based Bride on YouTube and @elizabethturn on Instagram. I'm excited to be here for the first time as a guest blogger for Archer & Olive, sharing the steps to make this Self-Care Bingo spread in your Bullet Journal!
2020 has been a year full of challenges, and it is more important than ever to tend to our mental and physical health. This spread turns self-care into a game or challenge, motivating you to prioritize your own well being.
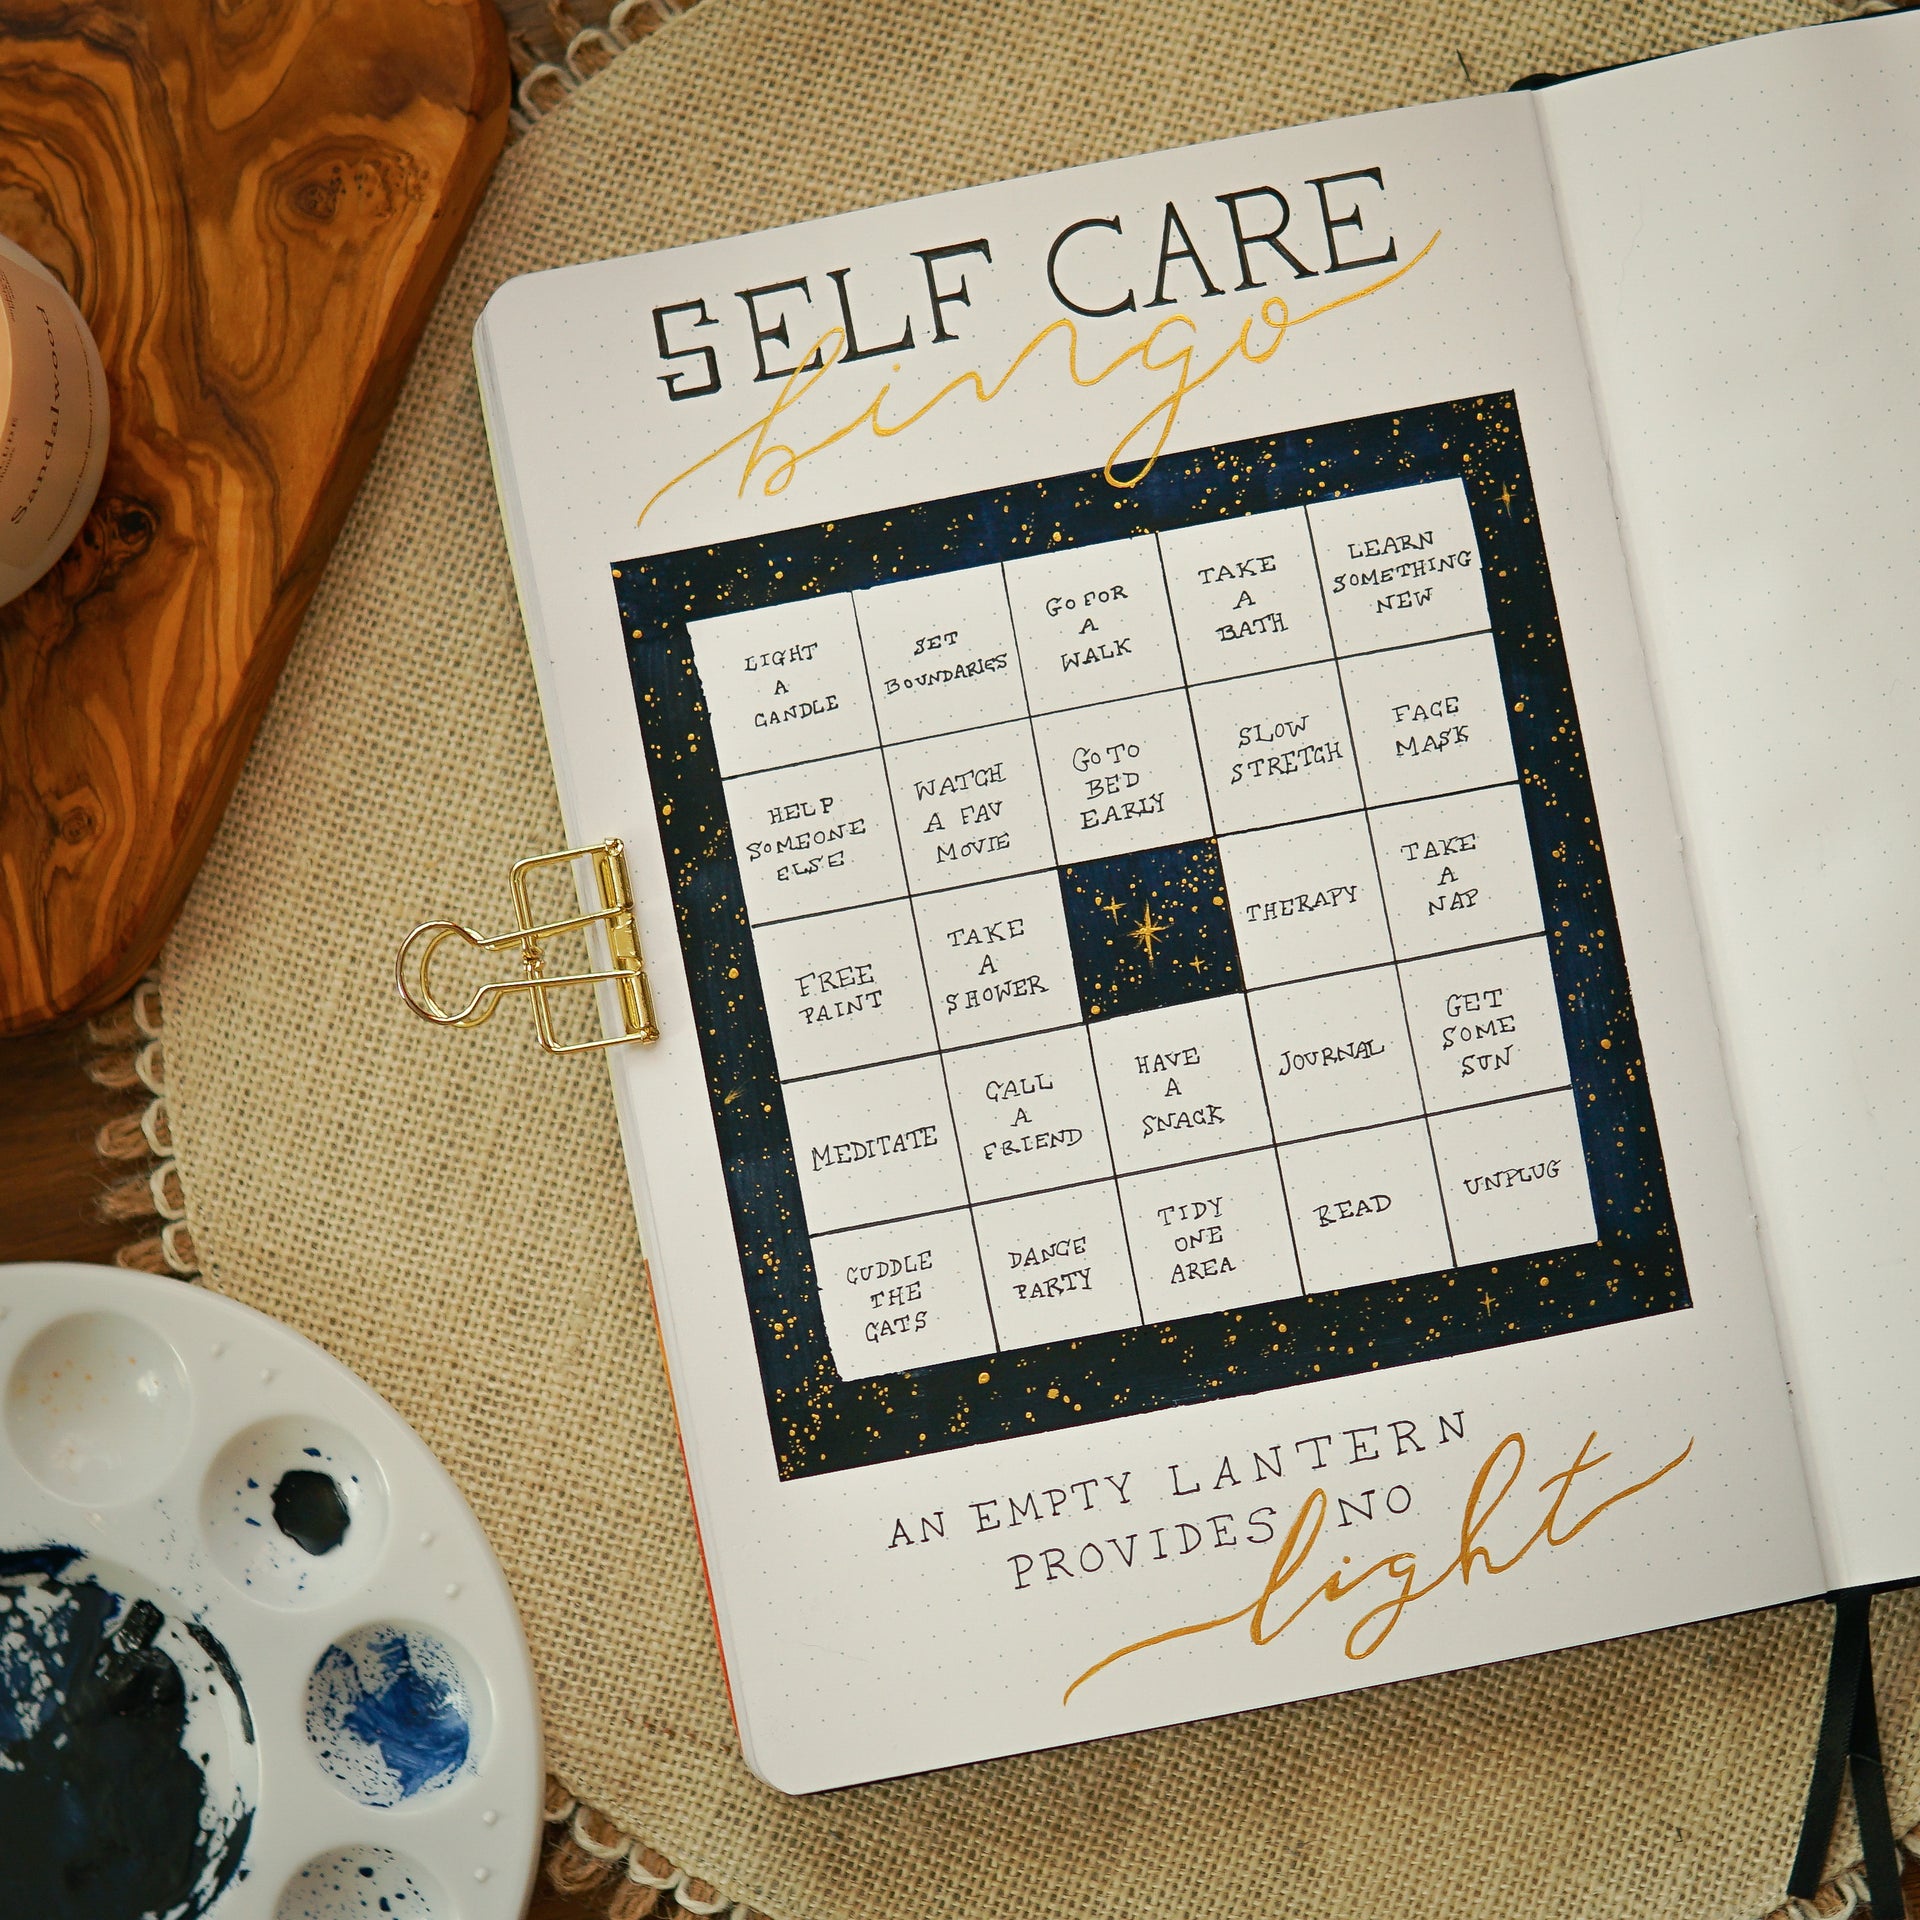
Follow along with this post and video as you create your own Self-Care Bingo spread!
SUPPLIES
- Bullet Journal - I’m using the Archer & Olive B5 Crescent Moon Dot Grid Notebook
- Pencil, Eraser, and Ruler (Circle Template optional)
- Paint or Markers (for the border and free space) - I'm using Winsor & Newton Watercolors in Ultramarine and Lamp Black but the blue Acrylograph Pen from the Jewel Selection would be a great option!
- Brushes, Palette, and Washi Tape (if using paint)
- Gold Gel Pen or Paint (for the stars and gold lettering) - I'm using both Pentel's Sunburst Gold Gel Pen and FineTec's Arabic Gold Watercolor Paint
- Black Pen - I'm using Sakura Micron Fineliners in 01 and 05
VIDEO TUTORIAL
STEP ONE: SKETCH
The first step is to use your pencil to do a quick sketch of your spread. This is the perfect time to play with dimensions and fonts to figure out the feel of your spread! The classic bingo card has 25 square spaces with a "free" space in the center.

STEP TWO: WASHI TAPE
This is an optional step to help you to get straight lines if you've chosen to use paint for the dark blue areas, as I did. Place pieces of washi tape along your pencil lines to outline the border and the center free space. I like to use washi tape as it's easier to remove without tearing the page.
If you're using markers you can use a ruler to create clean edges!
Bonus Tip: Erase all pencil marks inside your washi tape edge before you paint as you can't erase pencil marks under watercolor!

STEP THREE: PAINT
Now it's time to paint (or color) the dark blue border and center free space. I used Winsor & Newton watercolors in Ultramarine and Lamp Black to create a deep, almost black, blue. Then I allowed the paint to fully dry!
Bonus Tip: Use a damp brush with your watercolor rather than a fully wet one to create a deeper shade and to reduce drying time!

Once the paint has had time to dry you can carefully remove the washi tape.
Bonus Tip: Save this washi tape to use next time you need a clean painted edge!

STEP FOUR: ADD LINES
Use your ruler and black pen to create the lines separating the 25 spaces of your bingo card. I used the Sakura Micron 05!

STEP FIVE: STARS
Now it's time for my favorite part: adding stars to our night sky! I like to use the FineTec Arabic Gold Pearlescent Watercolors and a fine detail brush, but a fine-tipped gold gel pen would work just as well! This step can be a bit tedious, but it's almost meditative for me (and therefore great self-care). I like to add stars in irregular clumps and varied sizes. It can be fun to add some shining and shooting stars, too!
Shining and shooting star tips: For both of these variations you'll want to start with an almost dry brush loaded with paint. For the shining star, you will create a dot then drag out from that point in four directions, reducing pressure as you go to create a tapering line. For the shooting star, you will create a dot then drag out from that point three or four times in one direction, reducing pressure as you go to create tapering lines.

STEP SIX: LETTERING
Start with your black pen to create the serif lettering for the header at the top and quote at the bottom. I used both my Sakura Micron in 05 and 01 for the header and opted for the finer 01 tip for the quote.

Lettering Tips: I like to use a ruler and circle template to create a clean and uniform look for the larger letters. Start with a thin line and thicken it up slowly to fix mistakes and get an even line weight across letters. For smaller lettering, I tend to just freehand it and embrace the irregularity!

Once the black ink has dried you can add the highlighted gold lettering in the header and quote. I used a Pentel Sunburst gold gel pen and my natural cursive font for both 'bingo' and 'light'.

If you like, you can go over the gel pen with gold paint for extra shininess!

STEP SEVEN: FILL IN YOUR BINGO SPACES
And now it's time for the final step: choosing the self-care acts for each bingo space! Don't worry about including common acts of self-care if they don't work for you (a bath is only self-care if you actually enjoy taking baths!) and feel free to take your time. I hope my spread gives you some ideas to start!
Wait until all ink and paint is dry to erase your pencil marks to avoid smudging.

Now you can go forth and practice regular self-care and see how quickly can you get bingo!
I'd love to see your version of the Self-Care Bingo Spread. Tag me on Instagram @elizabethturn so I can see it!


2 comments
Love this :):):)
This is super good! And so beautiful!