


Hey friends! Emily of Planned and Planted (Instagram & YouTube) from the Archer & Olive Ambassador team back today with another tutorial for y’all. The holidays are coming up and Christmas is right around the corner (I know, I can’t believe it either!) It’s time to start decorating the tree and planning out Christmas gifts, and I have the perfect DIY craft for you this season.
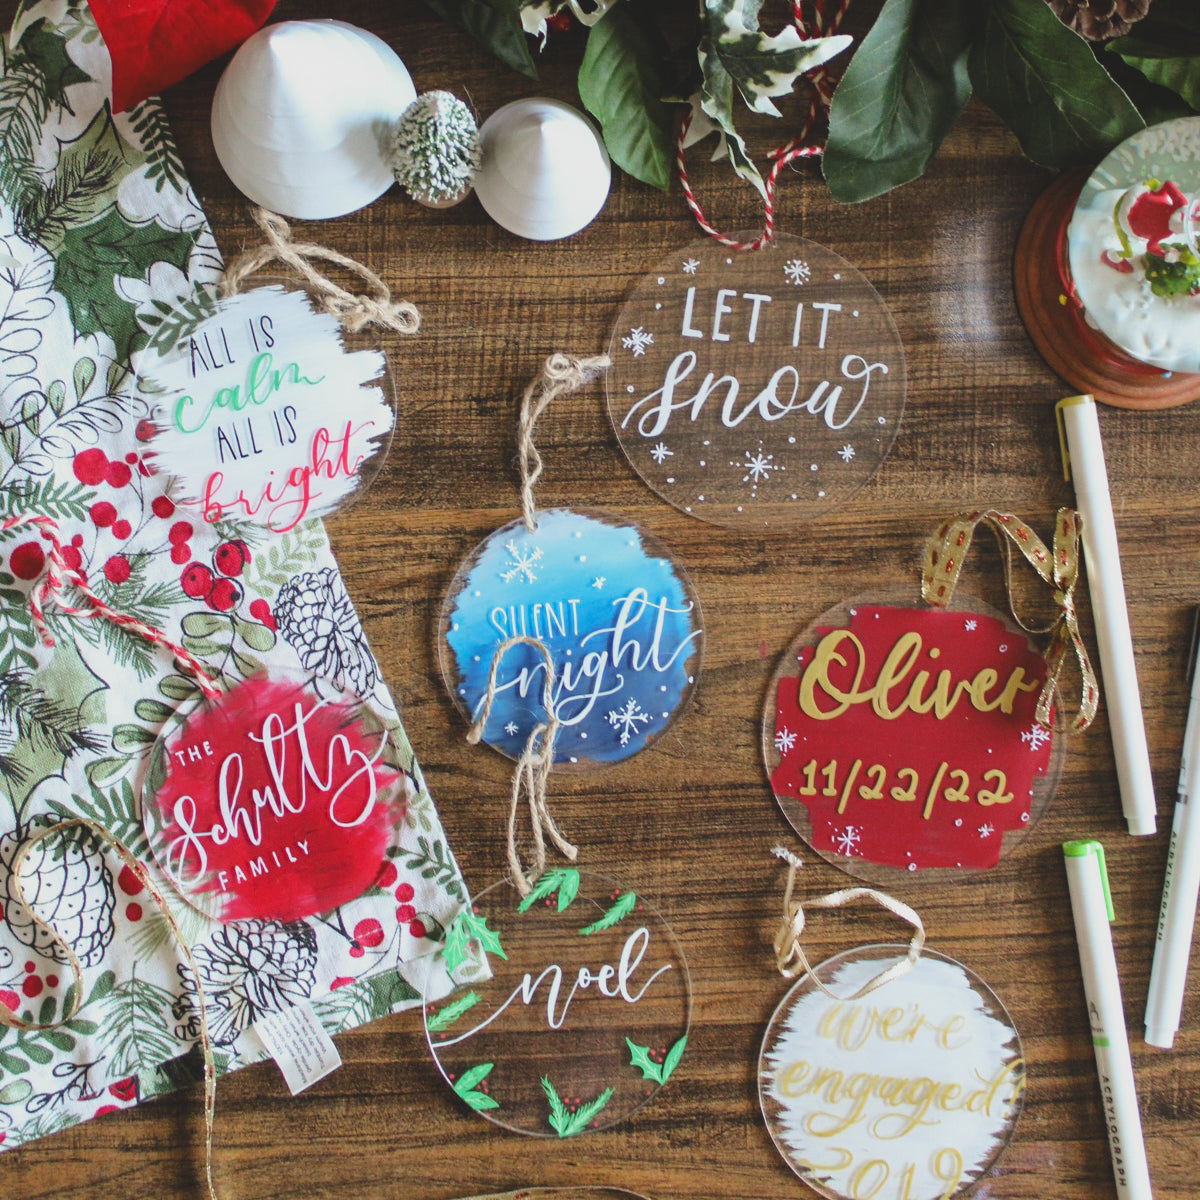
The holidays can get expensive fast, so why not save a little money this year with some custom, handmade decor and gifts? These ornaments, which could also be used as stocking tags, would look great on your own Christmas tree, customized to fit your holiday aesthetic and color palette. Or, you could gift it to a loved one to commemorate something momentous from the year: the birth of a new baby, a new home, marriage, graduation, etc.
You only need a few supplies to get started, and most of these supplies can be used for multiple ornaments. Here's what all you'll need for these DIY Ornaments.
DIY Christmas Ornament Supplies

- Acrylic Round Ornaments (Amazon Affiliate Link)
- Archer & Olive Acrylograph Paint Pens
- Archer & Olive Dot Grid notepad, or printer paper
- Ribbon or twine of choice
- Krylon Crystal Clear Spray Sealant (Amazon Affiliate Link)
- Pencil
- Craft paint or paint brush (OPTIONAL)
Make sure to use code PLANNEDANDPLANTED10 on your Archer & Olive order to save 10%!
How to Make a Custom Acrylic Christmas Ornament
1. Trace your ornament on the paper and sketch your design

The first thing you want to do is to use your pencil to trace the outline of your ornament onto the paper. Although you could use regular printer paper for this, I personally prefer to use a piece of paper from the Archer and Olive dot grid notepads to help keep my lettering straight and even.
I like to also trace the hole for the ribbon for positioning. From here, you can sketch any design you want to put on your ornament! The best part is since it’s just pencil on paper, you can erase and redo your design as many times as you like. You could paint an illustration, or keep it simple with some words.
If you don’t feel confident in your illustration or lettering skills, you could also print off a design from online to trace over. I created a few digital designs for you to download and print for FREE!

However, if you’re wanting a more custom design with a specific name or dates, you can try designing something on Canva or Microsoft Word to print off and trace.
2. Peel off the front covering of the ornament and center over the design
These ornaments almost always come with a plastic backing on each side that you need to peel of. Just do one for now to keep the back protected. Then place the ornament over the design you printed or sketched, with the now uncovered, shinier side facing up.
3. Trace over the design with your paint pen(s)

Now it’s time for the fun part! Pull out your paint pens, and start tracing! With the Archer & Olive Acrylograph pens, make sure to shake your pens well before use. And if it’s the first time you’re using them, you will need to do this a few times in addition to depressing the tip onto a piece of scrap paper until the ink starts flowing.
If you’re doing any blending or additional strokes for, say, faux calligraphy, I recommend working in small sections before the paint dries. While it’s still wet, it is easy to blend and to make lines thicker. However, once the paint dries, going back over it can cause some of the paint to flake or streak.
4. OPTIONAL: Use your craft paint color of choice and a paintbrush to paint the back of the ornament

Note: this step is optional! If you don't want to leave your ornament clear, skip straight to step 5.
If you want to add some more color to your ornaments, or make the background pop against the tree, you can use a paintbrush and some craft paint to paint the backside of the ornament. Just make sure to let the front design dry well first! And to peel the covering off the backside before you paint it.
5. Spray the ornament with a sealant spray

After one or both sides of your ornament(s) are dry, it’s time to seal them to protect them from scratching. I use this Krylon Sealant Spray, but you could use another type, or maybe some mod podge. Make sure to follow the instructions on your particular sealant. I always go outside to spray them inside a cardboard box.
The sealant spray I use takes about 5 minutes to fully dry. Make sure not to flip to the other side to spray until the previous side has completely dried.
If you want to get even more creative, you can try different finishes of spray, such as matte, glitter, or glow in the dark. The possibilities are endless!
6. Once dry, add your ribbon or twine

After the sealant has fully dried, cut a length of twine or ribbon of about 18 inches. I like to make them long enough to easily tie a ribbon. You can always cut off any excess. Then thread the ribbon through the hole at the top of the ornament, and tie into a bow.
DIY Christmas Ornament Video Tutorial
Time to gift or hang on the tree!

And voila! Your ornament is ready for its new home on your tree, above a stocking, or gift wrapped for a friend or family member. There are truly so many possibilities with these ornaments for the designs, color combinations, ribbon, and sealant finish.
If you make one of your own this season with some Archer & Olive acylographs, we’d love to see it! Tag @archerandolive on Instgaram to share you creation.
Wishing you all a very gentle and happy holiday season!


0 comments