


Hey friends! It’s Sarah from @essjay_florals on Instagram and Youtube. Today I wanted to share some cute, quick & easy covers with you all. It’s always fun getting creative with your bullet journal, but sometimes it can be overwhelming and a lot of hard work! So I decided to create some covers to inspire you all that each take less than 20 minutes, most are about 10 minutes or less though! I tried to cover a variety of mediums so there is something that can be adapted for all. Many of which can be completely changed to suit whatever theme you wish, so have fun with them!

I’ll list all the materials here and will break it down further for each of the covers as well:
- I’m using an A&O A5 Starry Sprinkles Notebook (unfortunately these are no longer available as they were limited edition, but there are many gorgeous notebooks available over here)
- Fine liners - I’m using Sakura of America Pigma Microns in 01 & 05
- A&O Calliographs – Jewel (currently out of stock, but other sets available over here)
- A&O Acrylographs – Tropical
- A&O January Floral Theme Box
- Watercolours – I’m using Paint Wild paints in Primary Red, Strawberry & Rosé
- A&O Stickers – Crescent Moon Decorative Stickers & stickers from a discontinued Fall Decorative pack, but there are plenty of other gorgeous sticker sets available here.
- Scrap Paper
- Glue Tape
- A&O Acrylic Stamps – Florals (currently only one collection available over here)
- Black Stamp Pad – I’m using Versafine
Remember you can use my affiliate code SARAH10 to get a discount on your Acrylographs, Calliographs, Notebooks or any other Archer and Olive products (excluding bundles or specials). To see a quick video of me creating the tiles, check out this video:
1. January – Monthly Theme Box – 10 mins
Materials: January Floral Theme Box, Micron size 01
For this cover I had to move around the stickers and washi to get an idea of what to do with them (you can see in the video I move them about a bit trying to figure out what to do). But once I saw the square stickers, I knew using that with the florals would work well as a central feature with the month sticker inside. Another option if you wanted to keep it super easy would be to use one of the larger die cut stickers as the central feature on the cover and then pop the January sticker below (you can see early in the video I placed one of these stickers on the page but decided to challenge myself a little). And then of course I had to add sparkles with the fine liner! I find adding sparkles is a super simple way to add a bit of interest and takes no time at all (I may or may not add this technique to a few of the other covers)

2. February - Watercolour Heart – 5 mins (excluding waiting for paint to dry)
Materials: Primary Red, Strawberry & Rosé watercolours from Paint Wild, Micron size 01
I wanted something very playful and quick here, so I really quickly painted a heart in the centre with some paint splatter and once dry simply used my fine liner to outline the heart roughly a few times and of course write the month down below. This was such a quick cover and including drying time it took a maximum of 10 minutes to create!
3. March – Simple Leafy Branch – 5 mins
Materials: Pencil, Eraser, Micron size 01, A&O Jewel Calliographs
First, I pencil in the stem, by doing this I can draw the leaves in fine liner and then add the stem in after (this helps if you want your leaves to partially cover the stem and look more natural). You could however skip the pencil stage if you wish! And after this it’s time to erase and then colour those leaves in (I used Olive & Moss Green), seriously so quick and easy and this can very easily be modified into a flower, a garland or even a wreath, so many options!

4. April – Acrylograph Eggs – 15 mins
Materials: Pencil, Circle Maker or Round Object, Tropical Acrylographs, Micron size 01
First off, I chose to use the Tropical Acrylographs for this theme as they absolutely scream Easter to me! Draw a circle with a pencil and your circle maker for the wreath. Use a green marker to draw in the wreath with leaves placed randomly around it. Then at the base choose a few colours to draw eggs of different sizes and go to town decorating! As always, I love using acrylographs because you can layer the colours on top of each other very easily. all you have to do is make sure each layer is dry before drawing over the top and this shouldn’t take more than a minute or 2 depending upon how thick the paint is. Once you’ve drawn in the design roughly outline with the fine liner and add the month in the centre of the wreath.
5. May – Polaroid – 17 mins
Materials: White scrap paper, Scissors &/or Cutter, Stickers – Decorative Fall and Crescent Moon Collections, Washi tape, Mauve Pearl from Jewel Calliographs, Micron size 01
This cover was a lot of fun and can be very easily tweaked to match a variety of different themes. First I cut my scrap paper into a polaroid shape (for reference I made my polaroid 18 squares x 14 squares, with a 1 square border on the top and sides and 3 on the base). Rather than gluing this in I started layering the stickers within and made them extend beyond the border to hold it in place. And then of course a little washi to ‘hold’ it in place! Finally, I used my Mauve Pearl calliograph to write the month and finish it off with fine liner sparkles! I found the most of my time was spent trying to decide on stickers, so this cover could be much quicker if you are more decisive!

6. June – Kraft Paper with Stamps – 17 mins
Materials: Kraft paper, Acrylic Stamps – Florals, Versafine black ink, Scrap paper, Tombow Fudenosuke, Cutter or scissors, Glue tape
Another design that is super easy to alter to fit any theme! All I did was start with a large piece of kraft paper and randomly covered it with stamps from the Florals set until I was happy with the coverage. Then cut it down to size, stick it in and grab a piece of scrap paper to write the month on! Seriously so easy, the hardest part is cleaning the stamps after!
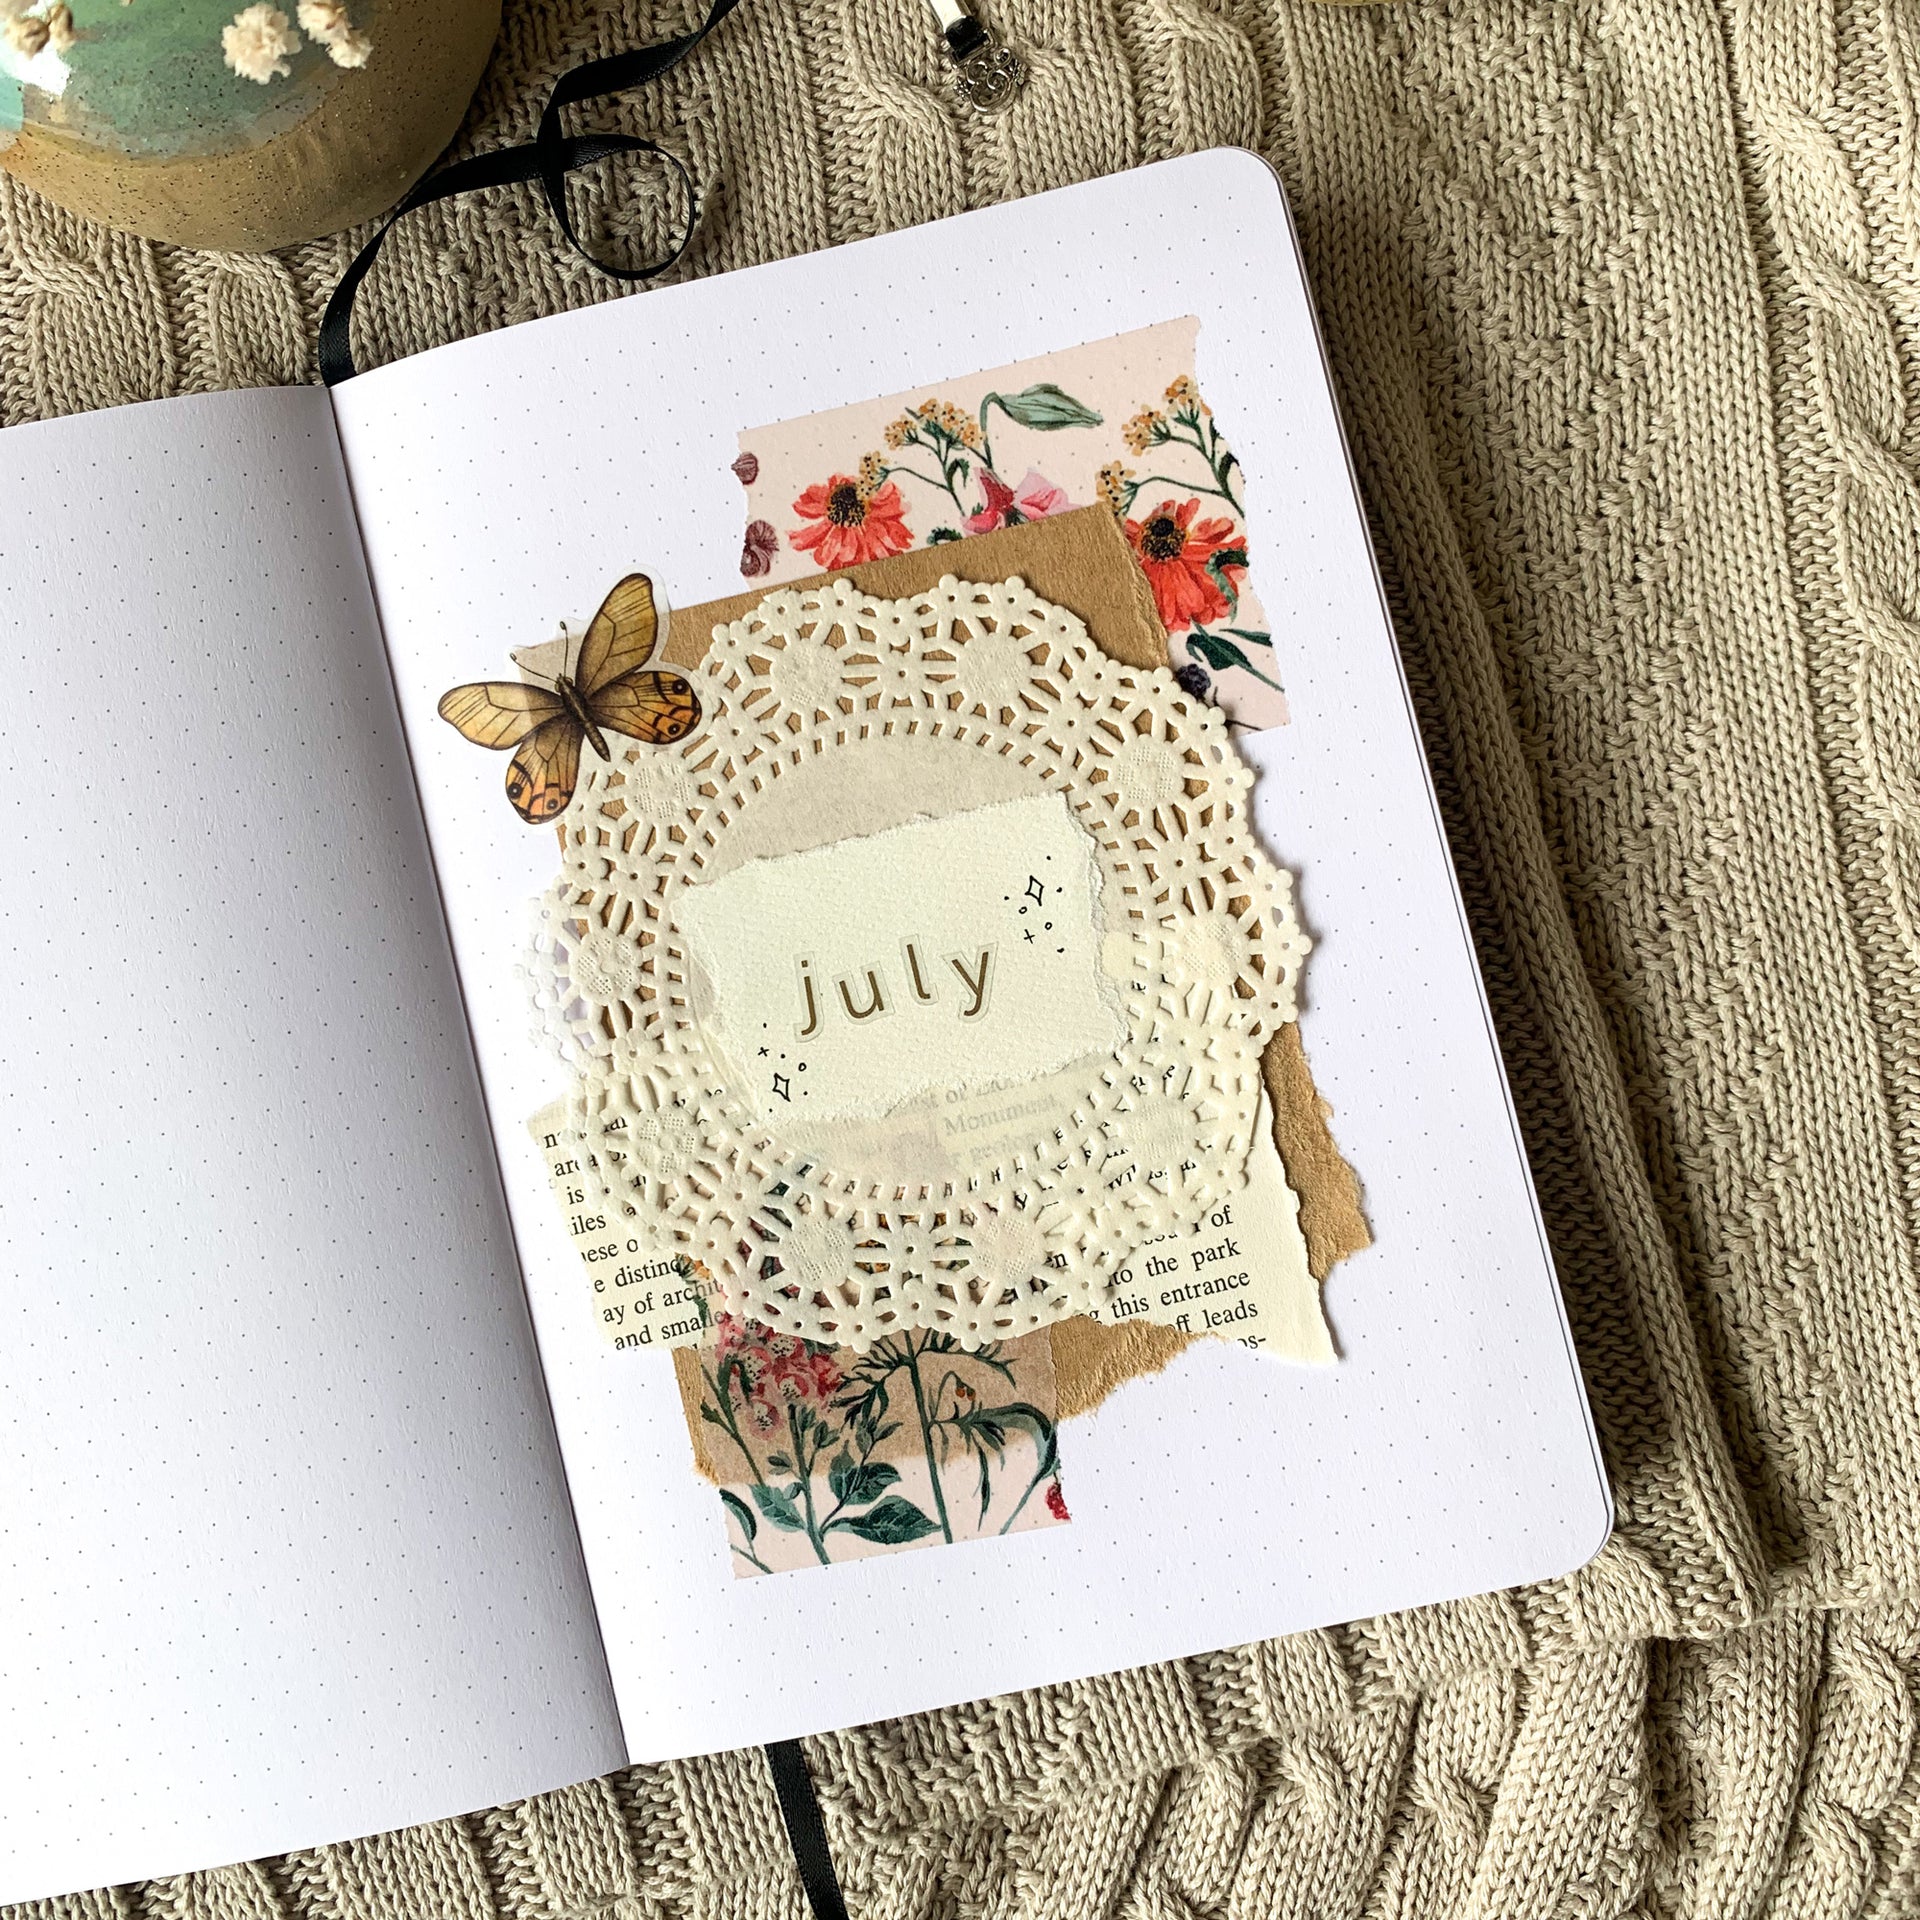
7. July – Collage – 11 mins
Materials: Scrap papers, Washi (I used Washi Tape), Glue tape, Letter stickers (mine were from Kmart Micron size 01
Ah guys I’m almost (but not really, haha!) getting sick of saying this, here is another easily adaptable theme. Collage can suit whatever themes or colours that work for you, and you can do it with whatever stickers, scrap papers, and washi you have! Again, this is something I struggle with deciding just where to put things, but some tips that I find helpful:
- Start from the centre of you page and work your way out
- Focus on layers, contrast is key – use texture, different colours, various mediums and shapes!
- Even with all the layers, remember you can still add some highlights with fine liners, of course I used my trusty sparkles here!

8. August – Simple Border – 6 mins
Materials: Micron size 05
I love drawing leafy branches right now and knew I had to incorporate it into this super simple design. This was really quick, I started with the leafy branch at the bottom right of the page and then extended it to create the border all the way around. Then I went with really basic, super simple lettering for the month. I kept it really rustic, a simple free hand border with the leafy branch, however you could use a ruler to draw the border for a nice clean minimal design.
9. September – Colouring Page – 5 mins
Materials: Colouring book (that you don’t mind ripping pages out of), Cutter or Scissors, Scrap paper, White gel pen, Glue tape
One of the simplest ideas that you can whip up in no time! Just grab a colouring in book, rip a page and cut it down to size, then stick it in! I then used a black piece of paper to nicely contrast the design and wrote the month on it (the part that took a the longest here was deciding on the right placement), I think I achieved it, haha! The fun thing about this idea is you can incorporate it into all your pages for the month super easily and you can either leave it as is or colour it in during the month!

10. October – Simple Doodles – 15 mins
Materials: Pencil, Eraser, Micron size 05, Jewel Calliographs, White gel pen
Whenever I want to keep a cover simple, I find using a central element to be helpful, so I pencilled in a circle in the middle of the page and began drawing in some cosy doodles. Once I was happy with them I used my fine liner to trace, the reason I choose to use a thicker fine liner for doodles is that I find fewer details is best and a thicker liner gives you more control for your linework when you are outlining (and not adding as many details). Once outlined its time to have fun and colour in your doodles. When it came time for me to colour the book, I used Indigo and didn’t realise how dark it would be so my outlines disappeared. I went back in after and outlined with the white gel pen to make the cover detail pop.
11. November - Printable – 7 mins
Materials: Printable, Glue tape, Cutter or Scissors, Contrasting paper, Stamps, Versafine black ink
Who doesn’t love a free printable? I have you guys covered – you can get this printable below! I decided to add some black paper beneath to make it pop and then grabbed some stamps to add the month, so quick and easy! And like the colouring in page cover you can go in colour it if you like.

12. December – Calliograph Wreath – 16 mins
Materials: Pencil, Circle maker or Round object, Jewel Calliographs, Paintbrush, Plate or palette, Water, Micron size 01
Begin with pencilling a circle in the centre of the page for the base of the wreath. Then choose your colours and use the broad end of your pen to scribble on the plate, add water and mix, then you can begin painting with it. As always with wreaths I place leaves randomly around it until it is filled. Then it is time to let it dry! Once dry I went back in with the fine tip and outlined the leaves and added branches and little berries. The reason I let it dry first was I wanted the lines to stay sharp, if you want them to bleed in feel free to outline when it is still wet. I then used the fine tip to letter the month (calligraphy is not my strong suit but I think I managed ok, which is a testament to how good the calliographs are!). I then finished it off with sparkles of course!

I hope these cover ideas give you some inspiration for cute, quick & easy covers. If you’d like to get your hands on the free printable cover download now. Don’t forget to tag myself @essjay_florals & @archerandolive if you’d like to share any of your inspired covers.


0 comments