


Hey everyone! It’s Chloe from @bulletjournalbychloe. Within this blog I’m going to teach you a technique to make a neon effect within your journal. This theme looks amazing in a blackout journal but it can also be created within a white journal too. This theme is super fun to add into your bullet journal and I loved making it!

You will need:
- Archer and Olive Journal - I used the Neapolitan journal. The blackout journal is perfect for this theme. You can also use a white journal but for the best effect I’d recommend a blackout journal.
- Archer and Olive Acrylographs - I recommend the neon, tropical or vernal set!
- Colouring pencils
- Gel pens - the brighter the better!
- Pencil
You can use my affiliate code bujochloe10 on Archer and Olives website to save 10%.
Step 1: Sketch Out Your Design
The first step is to decide on your design and lightly sketch this out using a pencil. Make sure that your design allows plenty of room around it so you can add the neon glow. The design we will be working with for this blog is the quote “Good Vibes Only”.
Step 2: Colour Bass
Pick the colour you want to use. I will be using Camilia from the vernal set in 3mm. This colour is such a pretty pink! Trace over your sketch creating a thick line coloured base. We will be building layers onto this colour base. Go over this 2-3 times to make it bright.

Step 3: Add Shading
Use a colouring pencil to shade around the lettering. Make sure the colour is bright and matches your base colour. This will help make the glowing effect.

Step 4: Adding A White Line
Use a white acrylograph pen in .7mm and draw a thin line over the top of the pink. Make sure to keep it thin and allow there to be pink either side of the white line. Check the photo for reference. You can also use a white gel pen.

Step 5: Adding Gel Pen
The final step to create this neon technique is to add the gel pen. I’m using a neon pink gel pen and outlining around the white line. This will help make the lettering transform into a neon sign! If you make a mistake by drawing over the white line, just go over it again with the white acrylograph. 
Step 6: Final Touches
To finish this quote page, I used the same technique to make a boarder. The colour I chose was bluestars also from the vernal set! You could also use a white pencil to shade in some bricks like I done for the March cover page.

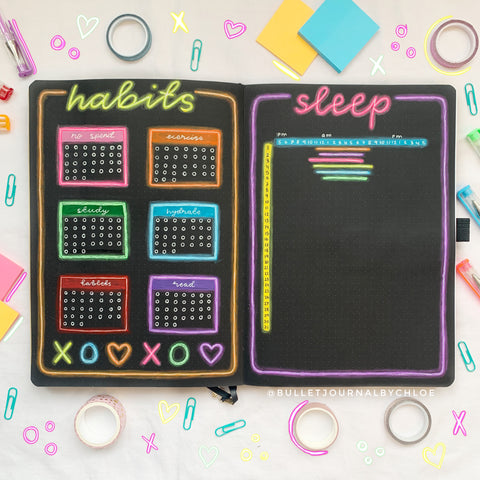
And that is how to create neon lettering! I hope you enjoyed this technique and feel inspired to give it a try. If you want to give this a go, make sure to tag me (@bulletjournalbychloe) in your recreations. Here are some spreads that I created within my bullet journal using this technique. Enjoy x


2 comments
Im am absolutely going to try this !
I really love this neon theme, and never knew it would be so easy to do! I’m practicing with a quote first, before doing the whole spread.
Thank you!