


Hi there friends!!! Shawna Clingerman here (@shawnaclingerman on IG and YouTube) and I am super excited to tell you all about my 100 Day Project this year!
I’m calling this project: 100 Days of Tiny Abstracts - and I hope this little practice will be the exact inspiration you need to start getting artsy in those little journals of yours!
As soon as I held this little journal from the Charming Picnic Quarterly Subscription box in my hand I knew it was destined to be the home for my 100-Day Project this year. This journal is just so sweet, and it feels perfect in my hands! Plus, at 112 pages, it is ALMOST the exact perfect size for something that I want to do 100 times!

What is the 100 Day Project?
If you haven’t heard of the 100 Day Project, I would encourage you to find out more HERE - but in a nutshell, this project is all about doing something for 100 days in a row (or in a row-ish if you are me, because every single day is kind of a lot of pressure!) in order to learn and improve your creative skills.
For my own 100 Day Project I decided to focus on my art journaling and mixed media skills, by creating 100 tiny abstract paintings! Basically, each day I add one little abstract composition to my notebook. With the intention of consciously building my understanding of composition, color, and shape.
How I Approach the 100 Day Project:
For me, It’s important to set my expectations when I start a practice like this. These pages are NOT supposed to be perfect. As I work day after day - not every page feels like a work of beauty, but even with the ones that don’t wow me, I’m learning more and more about how to create a cohesive abstract composition. Instead of perfection, learning and growing and regular practice is exactly what this project is all about.
If you are interested in hearing more about my intentions for this project including how I’m setting it up to be sustainable, as well as how I created my little template for masking off my squares I highly encourage you to check out this video on my YouTube channel. It will walk you through my thought process and how I got started with my book of tiny abstracts from day one.
As part of this practice, I add a new composition to my little Tiny Abstracts Journal every day - so that means today I’m going to walk you through how I create my next painting right here!
Supplies

Here are the supplies I will be using today as I paint a tiny abstract in my journal:
- A journal - of course! I will be using the A6 pocket-sized notebook from the Archer & Olive Charming Picnic Subscription box. However, you can create your own abstract squares in any sized journal that you would like!
- A few binder clips - these help to keep my journal open while I work, especially as my book is getting chunkier!
- Paintbrushes - I like to have several small paintbrushes on hand, a few flat brushes and a round brush or two as well.
- A plastic card for scraping paint - I love the effect of scraped paint so I use a basic key card from a past hotel stay in on my little abstracts. It can also be fun to use some little pallet knives for a slightly different scraping effect.
- White gesso or a simple white acrylic paint - I have been using white gesso on a majority of my pages - it gives me a nice base layer and also just breaks the ice each day before I start putting paint to page!
- PAINT! I am using all acrylic paint for my pages, and really any acrylic paint will do. My absolute favorite acrylic paint is from the Dina Wakley Media line.
- A date stamp - This is completely optional, but part of my process is stamping the date on each page - so I like to use a little date stamp each and every time.
- Black archival ink - To use with your date stamp.
- A basic journaling pen - Because I want this project to be an opportunity for learning and reflection.
- Diaper wipes - I like to keep these on hand because these are a great tool for when you are working with acrylic paint! Not only is it an easy way to wipe your hands or your work surface - it is also a great tool for wiping excess paint off of your composition.
Oh! And don’t forget a little jar of water for washing off those painty brushes! I also find it really helpful to keep some scratch paper to wipe paint off my brush when I’m not quite ready to get it wet yet.
Don’t forget! You can save 10% on your purchase at Archer & Olive using coupon code Shawna10!
Note: Some of the links in this post are affiliate links - this means if you go through them to make a purchase, I might earn a small commission at no cost to you!
Masking off a Square Shape for Your Design:
One of the most important steps in my own Tiny Abstracts Project was to create an easy way to mask off the square shape I was going to use to create my abstract each day. Originally, I was planning to use washi tape for this… but I quickly discovered that this step was going to be way too time-consuming to do day after day… So I created a little square stencil using a thick piece of cardstock using a simple Exacto knife.
This little template is sized specifically to fit the pages of my journal. It fits right in the back of my journal, where I have a little paperclip in place to keep it nice and secure until I’m ready to use it again the next day!

I also keep a handful of paperclips in the little pocket at the back of my journal, so that I can fasten my stencil to my page each day.

I’ll share more about how I use my square stencil on each page - but in the meantime, I wanted to share this free printable template with you! You can use this template to cut out your own stencil, sized perfectly for your own book of tiny abstracts!

(If you would like some guidance for how to cut out your templates - be sure to head over to this video that I mentioned above. I walk through the entire process there.)
What I Include on Every Tiny Abstract Page:
In order to keep the process of creating as simple as possible, so I use the exact same formula when I build my pages each day.

Here is what each page includes:
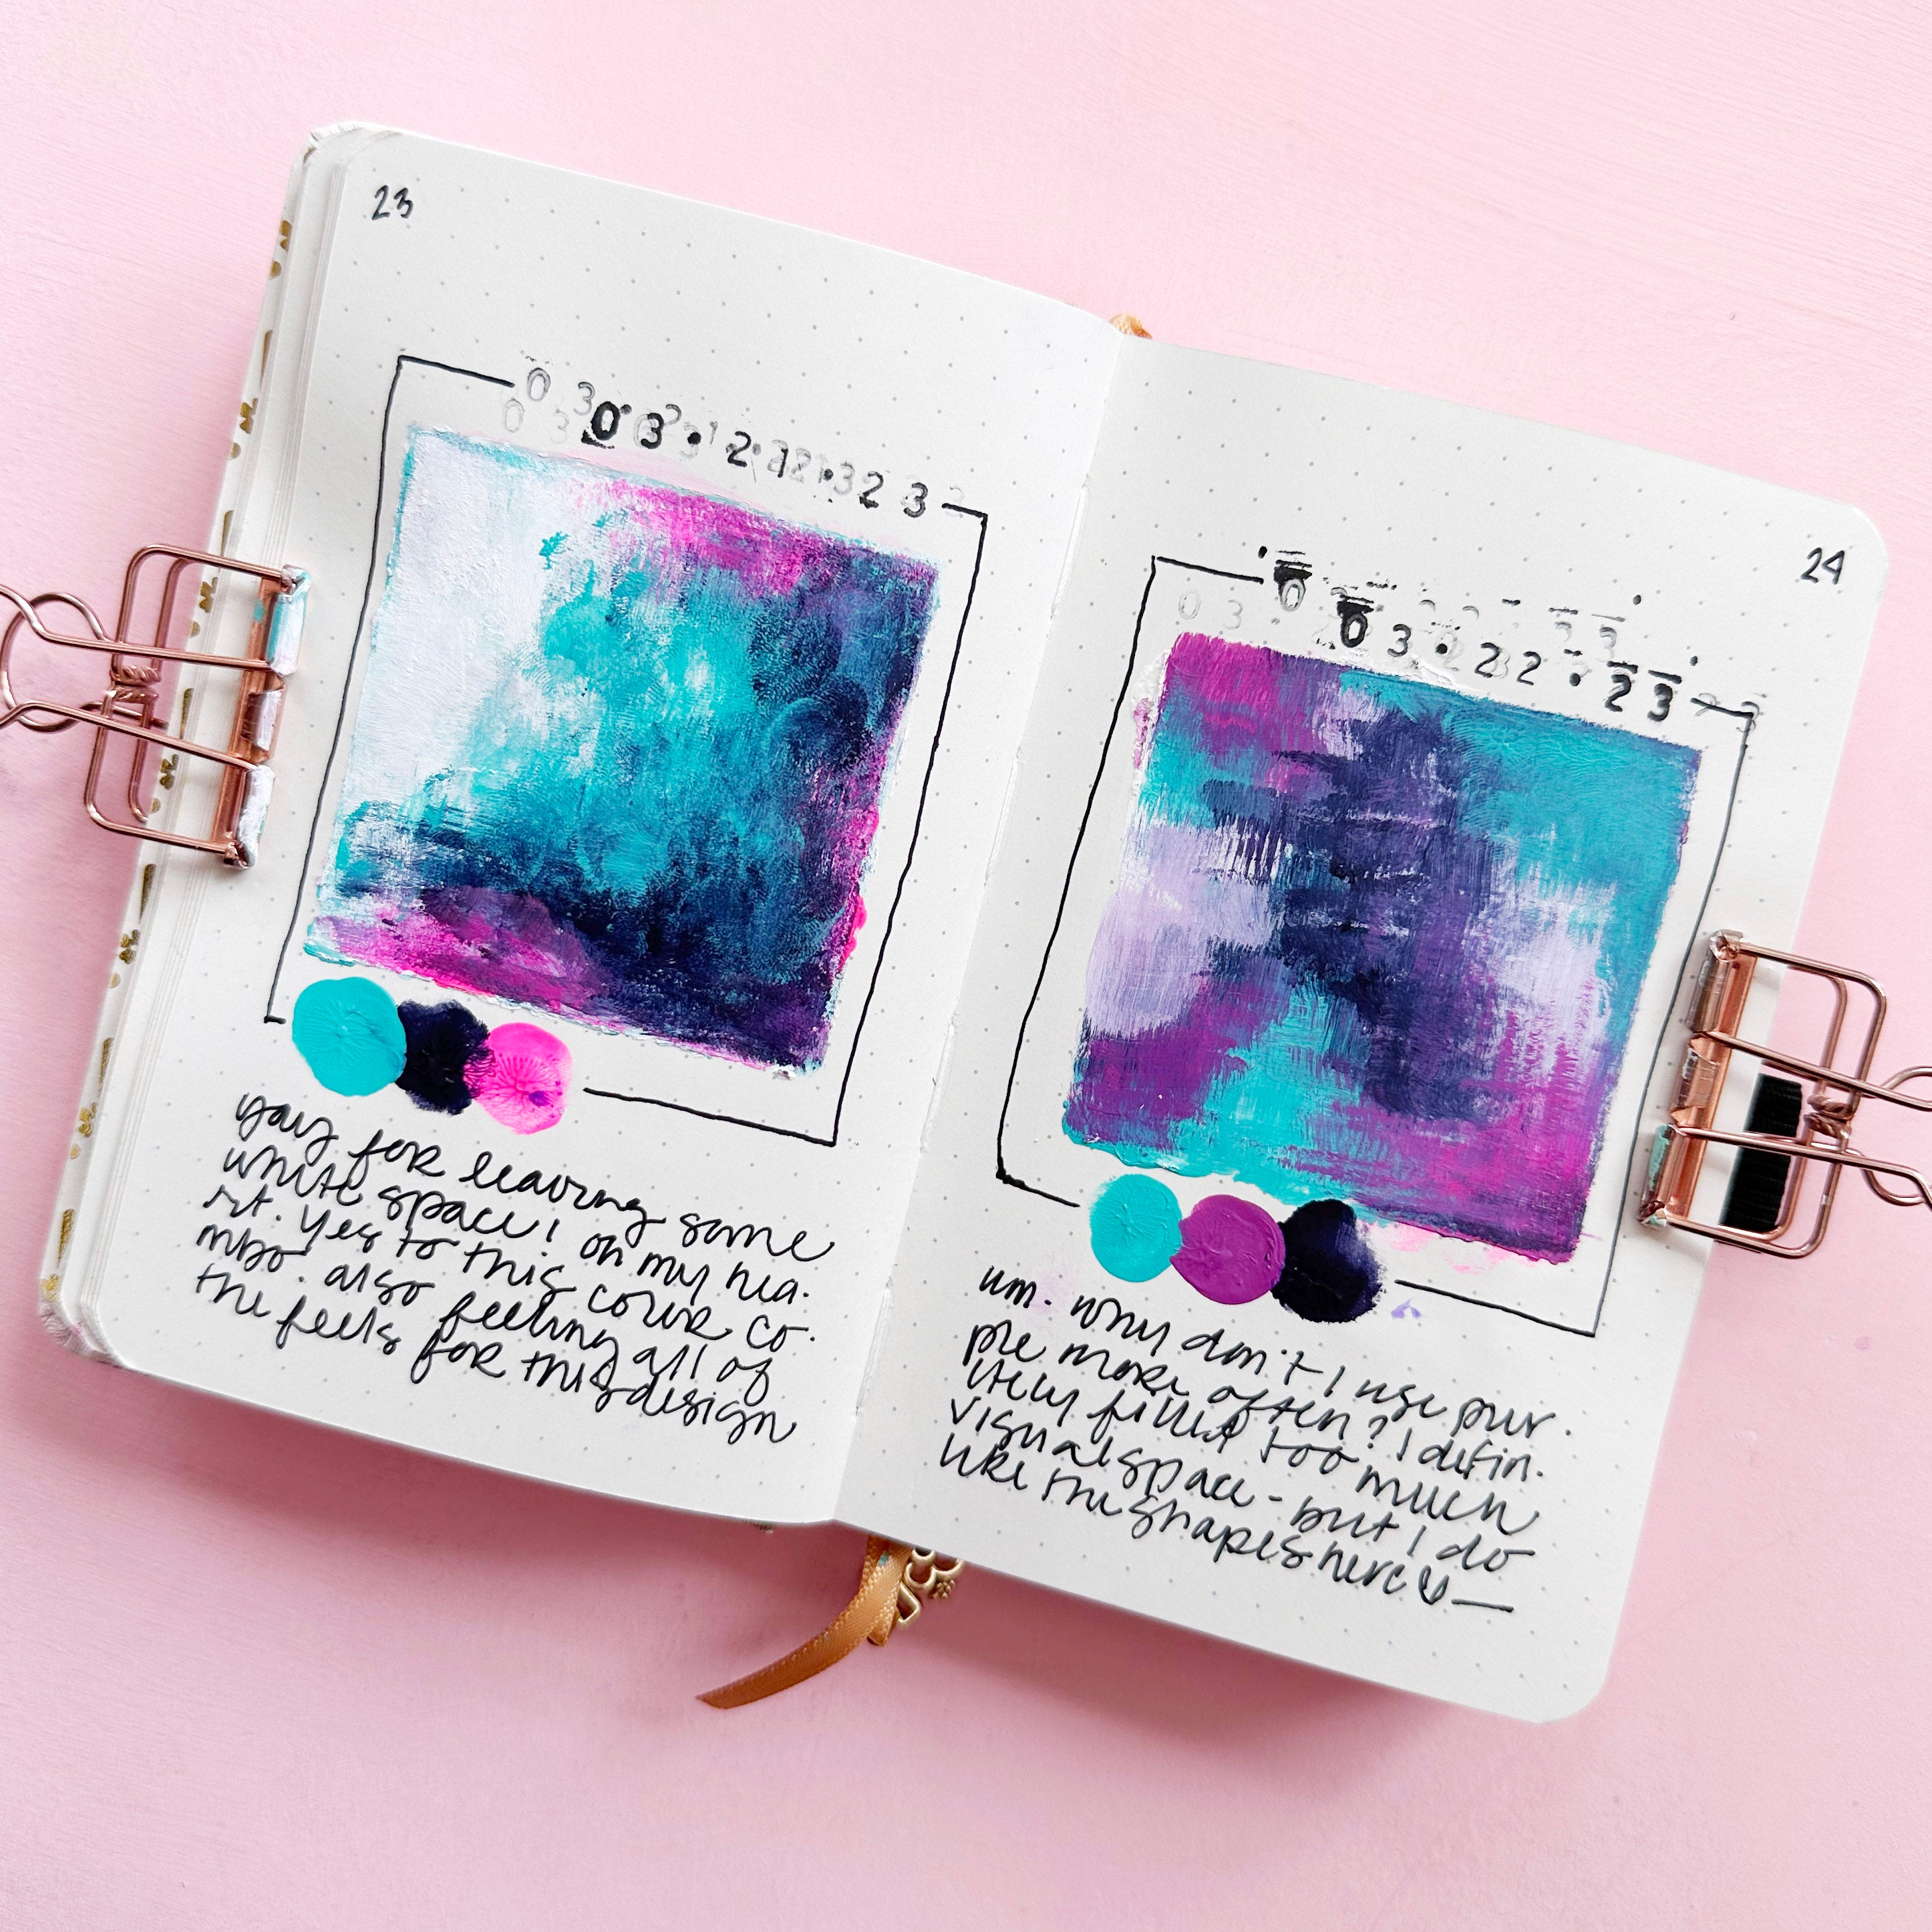
- The abstract painting itself - My handy little square stencil helps so much to keep the placement of my abstracts consistent page after page.
- A row of swatches for the colors I used that day.
- A hand-stamped date.
- A hand-drawn square frame that gives a little bit of a border to my abstract design.
- Finally, I also use the bottom of my page to jot down a few notes about what I’m learning along the way.
Another little trick that has really helped me with choosing colors day after day, is that I use facing pages to play with different variations on a color scheme. So that means that every two days, I’m playing with the color scheme - with just one or two colors traded out. This is a great way to play with my color schemes and compare and contrast what happens to various colors when you pair them together in different ways.

How I Create My Tiny Abstract Pages
Ok friends, it’s time! Let’s start creating!!!
I am so excited to walk you through my easy-peasy abstract creation process!!! If you want to see watch me work through the steps, be sure to check out the video below, and then follow along throughout the post where I will walk you through each part in more detail.
Creating a Tiny Abstract in your Journal - Step by Step:
STEP 1: Mask off your square shape.
- Because I designed my handy stencil to work with my Archer & Olive A6 pages, it is super easy to position my template each day. I simply line up the edges of my stencil with the edge of the dot grid pattern on each page.
- Once my stencil is in place, I fasten it down with a binder clip, and then I add a few of the paperclips from the pocket in the back of my book.

STEP 2: Start off your composition with a base layer.
- This step is purely optional because your acrylic paints will work just fine on an Archer & Olive journal page. However, I have found that starting with a simple white layer helps me a lot!
- Throughout my years as an artist, I have found that it is almost always a good plan to start a project with a simple base layer of gesso or even just white paint. This step helps to break the ice. Sometimes there is nothing more intimidating than a blank page - so, this simple step of starting with a basic white base layer instantly eases that fear!
- The other thing this base layer does for me is to add a little bit of texture and depth to my composition.
- To create your base layer, simply add a dot of gesso or white paint to your page, and spread it around. I like to use a key card to spread my base layer. As I spread my gesso/paint I move quickly and try to keep it imperfect and messy, no need to think too much about this step!
- If this layer is scraped on super thin, it will probably dry before you even have the chance to add another layer. BUT if you have a little extra texture in there you may want to hit it with a drying tool before moving on to your next layer.

STEP 3: Choose your colors.
- This step is really up to you! Part of the point of this process is to experiment with various colors and see how they work together on a page! I would encourage you to just start with colors you know and love, and then slowly start bringing different colors to your pages - you might be surprised at what color combinations you come up with!

STEP 4: Start painting!!!
- There are SO many ways to go about creating your own abstract compositions, and although there are a lot of concepts and rules of design that can have a real impact on your designs - I want to encourage you that it is also ok to just start playing with paint and see what you can learn from simply adding paint in your own way, one step at a time.
- Sometimes I like to start by putting down some of my lighter shades, but I have had days where I did the opposite as well! The process of trying something new and just seeing what happens is one of the best things about art! So don’t shy away from trying new things and doing this your own way!

It’s not really possible to give you step-by-step directions for the painting portion of the process, because every painting ends up having it’s own creative journey. However, I do have a few tips and tricks that might help you as you dive into creating your own little abstracts.
Tips For Working With Your Tiny Abstract Paintings
Work with a variety of tools as you paint:
Try scraping with a card, and then try scraping with a pallet knife. Use flat brushes, round brushes, and any other little brushes you might have on hand. Also, DEFINITELY try using your fingers at least once!

Fingerpainting is quickly becoming one of my favorite techniques to use on my tiny abstract pages!

Work quickly and play with different types of brush strokes:
Your paint will look different on the page depending on how you paint! Try using short brush strokes, and then longer strokes. Try working quickly vrs working show and carefully and see what happens, which version do you like more?
Try holding and moving your brush across the page in unconventional ways:
The further away your hand is from the bristles on your brush, the less control you will have over your paint strokes. So try shifting your hand and holding the brush at the end!
Another technique that can add to your design is to try rolling your brush around instead of just using traditional paint strokes. This will give your paint marks a more random feel.

In the world of abstract painting: more random and less controlled is a GOOD THING. So see what happens when you loosen your grip on your brush and let fate take the lead!
See what happens when you paint with a wet brush, how about a dry brush?
I personally like to keep my brushes dry as often as I can with these little pages - so I use my scratch paper or my apron and just brush all of the excess paint off before grabbing a new color. Some colors are stubborn and won’t completely wipe off your brush without water, but you might be surprised how little you need water as you work!
(Of course, always wash your brushes thoroughly after you are done painting, even those dry brushes need a good wash!)
Try different methods of adding paint to your page.
Try squeezing your fresh paint directly onto your page, and then try using a pallet and adding paint only with your brush. Both of these will give you a totally different effect on your page, try it and see what happens!
Play with layering on top of both wet and dry paint:
Consider whether you want to let your paint dry between layers, or if you want to give your colors the opportunity to blend. Wet paint on top of wet acrylic paint will always blend somewhat:

If the layer you are painting on top of is dry, on the other hand, your new layer of paint will simply cover the paint below!
As you play with this concept, remember to pay attention to what types of colors blend well, and what ones turn into muck when combined.
If you are unsure what works when blended and what doesn’t - here is a basic rule for you: The closer colors are to each other on a color wheel, the more likely they will blend well together.
However, the easiest way to really know what happens when to paint colors when they blend is to just test it out and see! (You can always use a separate piece of paper if you are worried about what might happen).
If you want to work with colors that don’t blend together well, no problem! Just be sure to dry each layer before adding another color - and when working with our tiny little squares this step doesn’t take very long at all!

TRY to leave some white space.
Personally, this is my biggest struggle! And working with a teeny tiny square certainly doesn’t make it any easier! As I work I am always trying to practice restraint, to not cover my whole square in color, but it doesn’t always work out that way because I just get carried away!
If you are an over-doer like I am, one trick is to ADD more white after you have gone overboard. I will often add white paint a few times through out my process. The beautiful thing about acrylic paint is that you can ALWAYS paint over what you have down, so if you add too much color, you can re-create some white space with a bit of white paint….

AND if you add too much white paint, you can always paint over that with some more color.
Seriously though, be careful friends! This can be a never-ending loop - if there is anything that slows me down on this process it is overthinking my color ratios and then overworking my paint. Just try to remember this painting doesn’t have to be perfect, and that tomorrow you always have the chance to try again!

Finally: Be brave.
Friends, you literally CANNOT screw this up!
Finishing Your Tiny Abstract Pages
Once your little abstract is all painted it is time to remove the template and reveal your work!

You may find that there is a little bit of paint that has leaked under your square mask - so I need you to trust me when I tell you that it is NOT A BIG DEAL! I’ve never had a composition that felt “ruined” by leaky or smeary paint, I promise! Once I have added my date stamp and swatches and doodled border it always looks just right.

Plus, sometimes the magic and the beauty really IS in the mess!
Now that our template is removed we can finish out our page with the remaining elements:
- Add your color swatches - My favorite way to add my swatches is to simply put a small dot of each paint color on my page, then I use my pointer finger to smoosh each dot down (being sure to wipe my finger between colors.

- Stamp the date - I use the same simple date stamp each day for this project along with a solid black ink. My favorite way to stamp a date is to make it messy by stamping it a few times at random - but a clean stamp would work here just as well!
- Draw your border - For this step I use the same pen I use in my everyday journal, and I simply draw a line around my abstract painting. I like to leave about ½ of a dot grid in between my painting and my line, and I really try to just let my lines be easy and imperfect. (In the places where my date stamp and swatches live, I simply break my line and then continue it on the other side.)
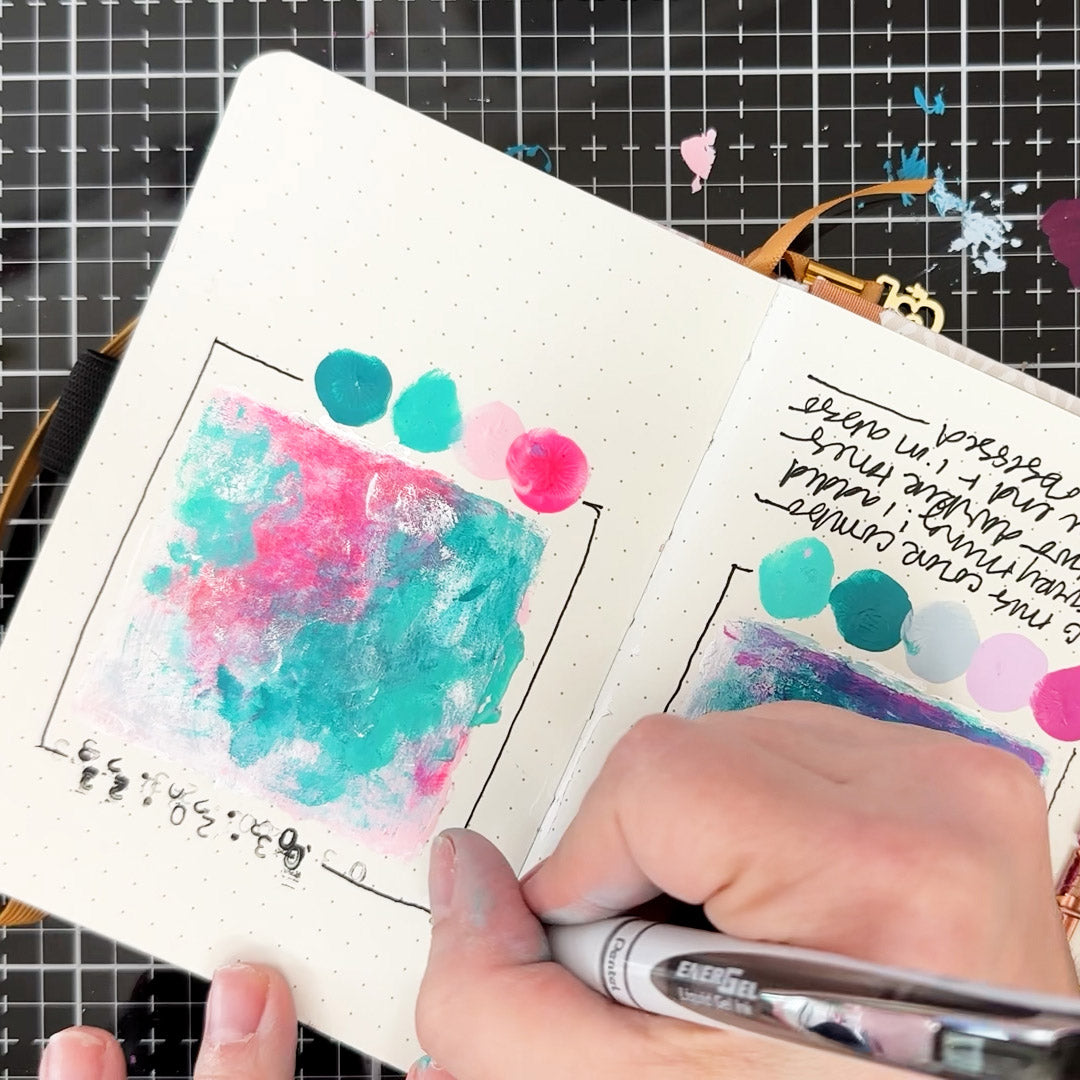
- Add a few notes to the bottom of your page - This step is important to me because it gives me a space to just collect my thoughts. If I love a color combo, or if I used a painting technique that rocked my socks, I write it down. I also write down when things happen that don’t work. For example, when I add too much paint, overwork a layout, or if two colors just won’t play nicely together. These notes remind me to take a minute and reflect on what I’m learning each day.

Curious about what I’ve written as notes for past paintings? Here are a few for you:
"Who would have thought that I could love a color combo more than the last!? Love the neon. Also, love the fingerprints!"
"I may have taken this a step or two too far, but I did stop. Let’s play with transparent layers again!"

Now Our Tiny Abstract is Finished!
Once we add all of our finishing touches our page is officially DONE!

Once my abstract is done for the day, all I have to do is to do is to tuck my little template in the back of my journal. I will also collect all of my little paperclips in the back envelope so they are all ready for the next page!
When it is all said and done, this book is fast becoming one of my most beloved creative spaces. I love the way each tiny abstract builds on the last, and every time I fill another page I just feel increasingly giddy about a little journal filled up to the brim with tiny abstracts that I love so much!
Not to mention how much I’m learning along the way!!!

I hope that this inspires YOU to pull out some acrylic paint, get a little messy, and a lot brave with your own Abstract painting! Although the idea of painting a “Tiny Abstract” might sound intimidating, I hope that everything I’ve shared here inspires you to dive in and just start painting! When it comes to art, we learn the most through DOING, and this little project is the perfect way to just start creating!

Now It's Your Turn!
Ok, friends! What do you think? Are you ready to try your own little tiny abstract project???
I’d LOVE to hear all about it if you do! AND if you use the above printable or the ideas in this post it would make my day to see what you create!
You can find me over on Instagram at @shawnaclingerman so be sure to tag me there, and follow along if you want to see more of my finished pages! Also, make sure to tag @archerandolive, and use the hashtags #AOShare and #archerandolive so that we can see all of your little mini abstract paintings!!!
OH! And, while you are over there on IG, you may want to check out my feed, and especially take a look at my reels tab, where I am regularly sharing process videos for my tiny little abstracts.
Ok, friends, it's time!!! Let’s go get messy!


1 comment
Really awesome 100 day challenge. Thank you for sharing your process for abstract art.