


Shawna Clingerman here (@shawnaclingerman on IG and YouTube) and I am super excited to share with you how I am incorporating simple watercolor designs into my everyday journaling.

I’ve been journaling (almost) every morning for years now - and the practice of daily journaling has made SUCH a huge impact on my life!
My journaling has looked different over the years: words only, printable stickers, some of my own printable artwork, little bits of inspiration taped in with strips of washi… there are so many ways to journal creatively!

Recently I decided I wanted to use more of my own artwork in my journaling - plus I really wanted to work some sort of creative practice into my morning journaling sessions. SO this practice of painting with watercolor directly onto my journal pages was born!
Although your everyday dot grid journal is not technically the right surface for your more extensive watercolor artwork, with the right techniques your everyday journal pages are totally up to taking a bit of watercolor paint! Today we will be taking advantage of the lovely thick pages on a standard 160 gsm Archer & Olive Journal to add a little something extra to our regular, long-form journaling pages!
I know that sometimes picking up new creative tools, like watercolor, can feel really intimidating - but I am here today to show you that using watercolor on your journaling pages can be SO EASY!
Don’t believe me? Follow along below and I’ll show you exactly how to get started!
Supplies
- A Journal - I am using my Archer & Olive A5 journal (this particular journal is from the 2023 Valentine’s Day box)
- Watercolor Paint - I highly recommend the Archer & Olive watercolor collection - it has performed beautifully on my journal pages!
- A paintbrush - I am most often using a round brush, but a flat brush is super useful for some of these techniques as well! These are the brushes I currently use most often.
- Water - no links required, just grab a little jar of water for activating your paints and cleaning your brushes!
- Also - you will need your favorite journaling pen for when you get to the actual journaling part! This is my favorite journaling pen and I often also use a simple black brush marker to add a bit of extra inspiration to my page.
Don’t forget! You can save 10% on your purchase at Archer & Olive using coupon code Shawna10!
Note: Some of the links in this post are affiliate links - this means if you go through them to make a purchase, I might earn a small commission at no cost to you!

How to Add Watercolor to Your Journaling Pages:
Adding watercolor to your journal pages is easier than you might think! In the video below, I will walk you through my process. Then feel free to read through the info below for more info about working with watercolor paints in your journaling. And don't forget to download the free printable below! I created this tool for you so that you have everything you need to get started with watercolor in on your own journal pages!
As you consider adding watercolor to your journaling spreads - let me take a minute to walk through what to consider when adding watercolor to your journaling page:
Placement: How to Arrange Your Designs on a Journal Spread
My favorite way to create a journal spread is to start with the watercolor design. This means that right off the bat I have to consider where my artwork will live on my page. There really is no wrong way to place your designs, and actually - if you are like me and you plan to fill in the rest of your page with words, where you place your artwork is not as important as it would be in a more open page.
However, there are a few things that help me choose where to place my artwork, use the tips below to help you decide how to place your designs on your page.

Layout Tips for Your Journaling Spreads:
- Work around the edges: The edges of your journal are a natural visual border for each spread. Working inward from the edges of your page helps to anchor your artwork by working with those edges that already exist.
- Group your designs: Regardless of what design you choose to put on your page - clustering and grouping your designs gives your page a more intentional look. When marks are spread evenly across a page it doesn’t give your eye something to latch on to. Instead of scattering artwork all over the place - choose several spots on your page to cluster your designs together. This will make a big difference when it comes to the visual impact of your page.
- Take the balance of your design into consideration: Now, don’t confuse this for “Make everything perfectly symmetrical across your page.” Balance is not about symmetry or mirroring - instead, it is about the visual weight of designs on a page. When you place something large on one side of your page, consider balancing it out with 2 or three small clusters of designs on the opposite side.
- The rule of 3s: This is just a nice little extra that regularly helps me when designing the layout of a design: Everything just looks better in 3s. Our eyes like a triangle, and if we can create visual “triangles” by placing things in threes it makes our eyes extra happy. Sometimes I use the rule of 3s when I’m designing the full layout of artwork on my page, and sometimes I use it on a smaller scale, like using clusters of 3 paint swatches or 3 flowers. Either way - 3’s are always my go-to when I’m not sure where to put something on my page.

Technique: Tips for Using Watercolor Paints on Your Journal Pages
- Watch your water use - Watercolor needs water to work, water is what makes the actual watercolor magic happen, so don’t take this to mean you should use no water, or even minimal water on your journal pages. Instead, use as much water as you need, without totally flooding your page. Aim for wet flowy pigment, without the excess water that leaves big puddles on your page.
- Avoid overworking your paint - Simply put, this means try to resist the urge to keep painting over and tweaking your wet watercolor once it is down on the page. When working with a journal that isn’t designed for watercolor it is especially important to treat your paper with extra care. Wet paper is more fragile, so go easy on it and don’t keep brushing over and over on paper that is wet.
- Let your paint dry before adding another layer - Whether you are overlapping colors and shapes or adding extra little details, you will have the most success on your pages if you let your watercolor dry before adding more paint. That being said, sometimes the techniques you want to use will involve colors blending or mixing together (ie: wet on wet technique) - in this case, just be extra gentle with your already wet page.
- Use a “thirsty brush” to pick up extra liquid - If you are finding your paint is puddling, or if there are little patches of wet paint that don’t want to dry you can totally pick up some of that liquid and pigment using what the call a “thirsty brush.” All you have to do is take a totally dry brush and dip the tip into the wet puddle on your page - that thirsty little brush will drink that excess fluid right up!
- Be careful not to smear - because watercolor paint is, well, wet. You are going to need to let it dry before you start the journaling portion of your page. You also want to make sure that you aren’t putting your hand or arm into the still-wet designs as you are painting in different areas of your page.
Also, something to note when using water in your journal - some pens and inks are water-reactive, and some are not - my very favorite pen tends to bleed if I get the ink wet. For me, this is just a quirky part of the process, but if smearing ink is something that might ruin your day then you might want to find a pen that won’t react at all to water.

If you would like some more tips for working with watercolor in your journal, Here are a few more articles about using Watercolor in your journal:
- Six Tips For Using Watercolour In Your Journal
- Tips And Tricks For Using Watercolor In Your Bullet Journal
Watercolor Designs Ideas for Decorating Your Journaling Spread
Now that we know all the basics, it is time to get to painting! But before we can do that, we have to decide what to paint!!!
Now I know that trying to paint a design can be super intimidating, but trust me, this can be super easy peasy! As you read through the ideas below, give yourself permission to start with something super simple - swatches and splotches are super easy techniques to try, and with every page you paint on, no matter how simple, you will grow your skills and get to know the medium of watercolor more and more!
SWATCHES
Swatches are the absolute easiest way to add watercolor to your pages - this technique simply involves using your brush and creating small little downward strokes on your page.
I start with a single color and create a single swatch in several places around my page. Then I go in with a few more colors and layer them next to and slightly over my previous swatches! You can cluster these little swatches around your page and end up with a really fun, and super simple design!

When playing with swatches, try out a few different techniques: Round brush or flat brush, shorter strokes or longer strokes, letting layers dry or (carefully) painting wet paint on top of wet paint and letting the colors blend together a bit. For such a simple concept, there is SO MUCH you can do with your swatches! Do some experimenting and see what works for you!
SPLOTCHES
Ok, let’s just get this out of the way right now. I have no idea what the technical term is for this type of design that I am calling “Splotches.” The idea behind this type of design is that you just sort of create a messy “splotch” of paint on your page. By layering another splotch on top of the first splotch, either while your paint is still wet or after the first layer is dry, you can create a really artsy, painterly vibe on your page.
For this technique, you want to just grab a round brush (i like a slightly bigger-sized brush for this technique) and just sort of dab it on your page. Don’t draw a shape with the tip of your brush, instead just dab your brush around, using the side of your brush to create a more imperfect and organic shape.
After your first layer, add one or two more colors, overlapping your original shape, being careful to choose colors that will blend well with one another.

This is definitely a technique to try a few times, I find that splotches never look the same twice - and you will be amazed at how differently your paint behaves when you add a new splotch on top of a still slightly wet shape. So much fun to watch the watercolor play!
GEOMETRIC SHAPES
Drawing shapes in your journal is pretty straightforward - but it can be a great way to create a design if your mind feels blank. You can use any type of shape really: circles, triangles, rectangles, hexagons… even just blobby abstract shapes!
My favorite way to do this type of design is much like the way I do the swatches technique - start by drawing a few shapes around your page, and then add additional - somewhat overlapping - shapes to create several clusters balanced around your page.
For shapes, I find it works best for me to let the first layer dry before adding another overlapping shape. Wet paint tends to bleed into the new, overlapping, shape which makes each of the shapes a bit less identifiable. That being said, blobby and blendy shapes are kind of a design all of their own! There is no wrong way to add some abstract design elements to your page!

SWOOPS
This design is a bit more detailed than the above 3. So be sure to give yourself some extra practice and extra grace as you start to play around with some swoops.

For a swoopy design, I simply start with one line that curves ever so slightly, and then I add additional swoops that grow outward from the original swoop. The beautiful thing about drawing this shape is that it is flexible, so you can create bigger or smaller or straighter or curvier swoops - whatever you need to fill in the space.
The hardest part for me about swoops is knowing when to stop! Sometimes I do get carried away with this idea, but the best thing about painting swoops on your page is that you get to decide exactly how much space you want to fill with your design.

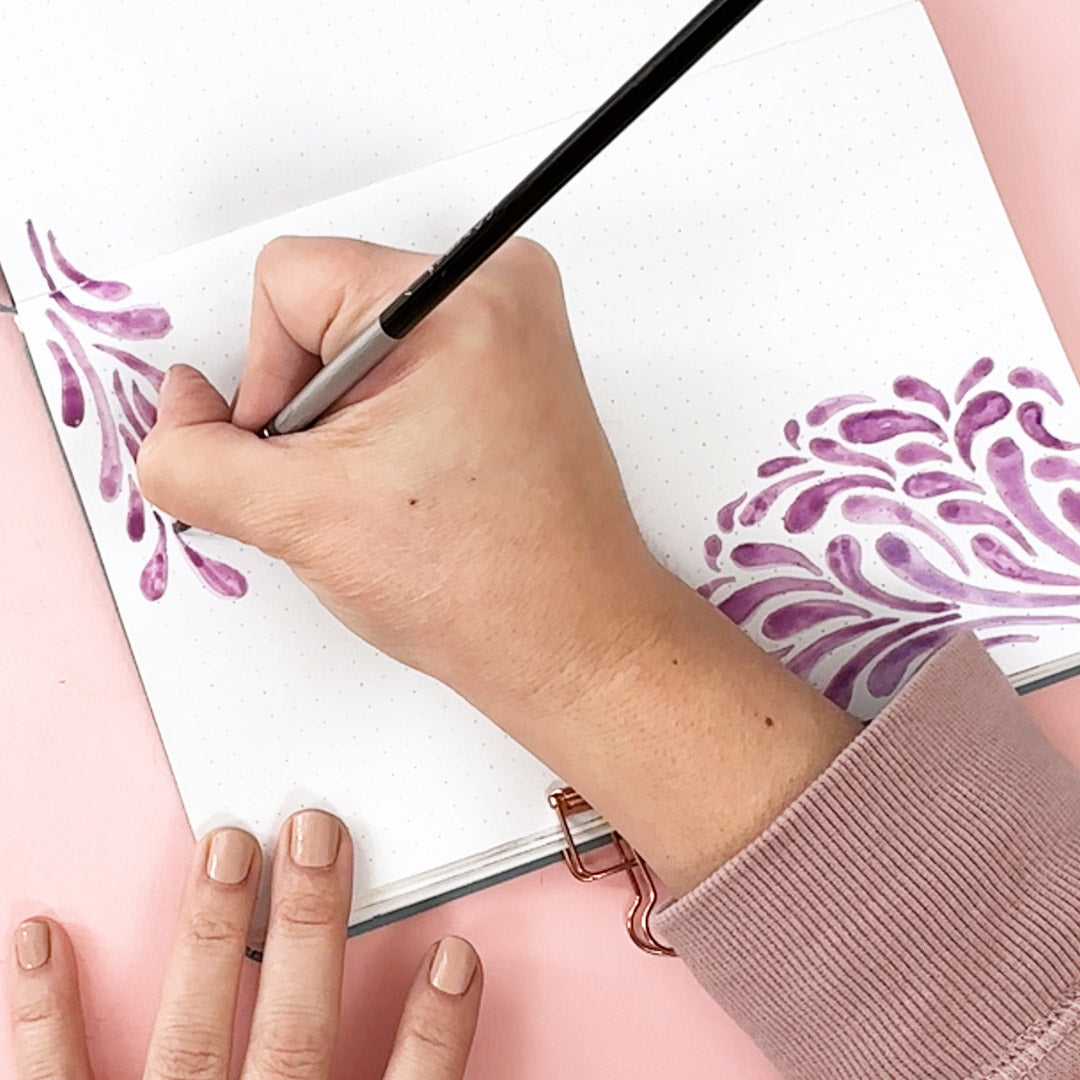
FOLIAGE AND FLORALS
If you want to get a little more literal with your watercolor artwork, foliage and florals are a great way to do that!
When creating foliage on my own pages, I usually stick to vines with leaves. I love to use this type of foliage because they function a lot like the swirls method mentioned above - however when you add the little leaves it gives a totally different vibe!

For this type of design, just start with a somewhat swoopy line, and then add additional lines building out from our original stem. After the stems are in place, you can add leaves liberally!
Although flowers are a bit more complicated to create - they can also be worked into your journal pages just like all of the designs mentioned above!
 If you would like to try your hand at a flower or two I really recommend checking out some of the tutorials below from the Archer & Olive content team:
Watercolor Flower Tutorials:
- Quick + Easy Loose Watercolor Floral Tutorial
- How To Create An Easy Spring Watercolor Floral Pattern
- Mixed Media Spring Leaf Border Tutorial
Free Printable: Easy Watercolor Designs for Your Journal
Want a little cheat sheet to help you with creating your own watercolor journal spread??? Download the free printable below for a handy little watercolor design guide.

My Step-by-Step Process for Decorating my Journal Pages with Watercolor:
So now that you have the basics, let’s walk through the steps I myself use when I sit down with a blank spread for journaling.
Step 1: Start With Watercolor
As I mentioned, water can have a tendency to smear the ink from your favorite journaling pens. So I solve this by painting first. The other lovely thing about painting first, is that it helps to define what space is open for your journaling when we get to that step.
Although you can plan out your layout in advance, I tend to enjoy just winging it - meaning I start somewhere on my page, and then I add additional clusters of artwork from there. All the while paying attention to the layout tips I shared above.

My favorite thing to do while I’m creating my watercolor design is to listen to a meditation or some soothing music of some sort.
If you are interested in listening to what I’m listening to check out the meditations by Sarah Blondin, or you can tune into My Morning Playlist over on Spotify and see if it fits your tastes.
Step 2: Add A Quote of Affirmation of Some Sort
This step is purely optional, and if it stresses you out or makes you question your lettering or handwriting abilities, please do go ahead and skip it!
But, one thing that I am sure you will notice on my own journal pages is that I almost always add a quote or affirmation of some sort. I will generally pull out one of my basic, black brush pens, and letter a quote or two in a few spaces on my page.

Step 3: Start Journaling!
Ok, friends! This is the easy part! Now that we have our decorative elements down on the page the only thing left to do is to journal!!!
I hope that when you look at my sample pages you can see that I’m not being precious over here with the journaling part - these are the pages that I use to clear my head, to daydream about the future, to write letters to myself - sometimes I even wax poetic! When you get to the journaling part, just WRITE, make it messy, make it easy, and most importantly - make it relaxing.

Our journaling pages are sacred, they matter not because of the beauty of the page itself but because of the heart and soul contained within them! SO don’t let your quest for a “pretty page” get in the way of what matters - just journal.
During this step, you can overlap your watercolor designs if you would like. Or you can choose to write in the blank space between your designs. Either works and as long as you let your watercolor dry you should be able to write on it just fine!

Are You Ready to Add Watercolor to Your Own Journal Pages???
Ok, friends! What do you think? Are you ready to start incorporating some watercolor designs into your own journaling practice? What design are you going to try?
I’d LOVE to hear all about it! AND if you use the above printable or the ideas in this post it would make my day to see what you do!
You can find me over on Instagram at @shawnaclingerman so be sure to tag me there, and follow along if you want to see more of my finished pages! Also, make sure to tag @archerandolive, and use the hashtags #AOShare and #archerandolive So that we can see all the ways that you are building your own inspiration journals!!!
Now, let’s get to journaling!!!


0 comments